


Removing and Installing Parts 119
CAUTION: Before you perform this procedure, see "Safety First—
For You and Your Computer."
NOTICE: Before disconnecting a device from the computer, wait 10 to 20
seconds after disconnecting the computer from its electrical outlet. Before
removing a component from the system board, verify that the standby power
light on the system board has turned off. To locate this light, see "System Board
Components" or the interior service label.
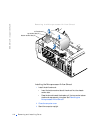
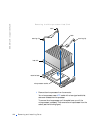
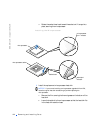
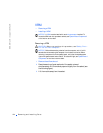
1
Remove the microprocessor airflow shroud.
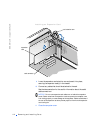
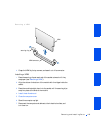
2 Remove the microprocessor heat sink:
a For each of the metal clips that secure the heat sink to the
microprocessor, press down on the clip’s latch to release it from
the heat-sink retention base. Then lift the clip away from the heat
sink (see the following figure).
b Lift the heat sink away from the microprocessor.
NOTE: If you are upgrading your microprocessor, keep your original
microprocessor heat sink and securing clips for future trouble-shooting.
NOTE: Your microprocessor upgrade kit should include a replacement
microprocessor heat sink and two replacement securing clips.
NOTICE: If you are
not
installing a microprocessor upgrade kit from Dell,
reuse the original heat sink and securing clips when replacing the
microprocessor.