


96 Removing and Installing Parts
www.dell.com | support.dell.com
NOTE: Tape drives sold by Dell come with their own operating software
and documentation. After you install a tape drive, refer to the
documentation that came with the drive for instructions on installing and
using the tape drive software.
Installing a Hard Drive
NOTE: If you are replacing a hard drive that contains data you want to keep,
be sure to back up your files before you begin this procedure.
CAUTION: Before you perform this procedure, see "Safety First—
For You and Your Computer."
NOTICE: Before disconnecting a device from the computer, wait 10 to 20
seconds after disconnecting the computer from its electrical outlet. Before
removing a component from the system board, verify that the standby power
light on the system board has turned off. To locate this light, see "System Board
Components" or the interior service label.
1
Turn off the computer and devices, disconnect them from their
electrical outlets, and wait 10 to 20 seconds.
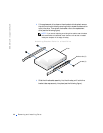
2 Lay the computer on its right side.
3 Open the computer cover.
4 If you are replacing a drive that is already installed in the computer,
continue with step 5. If you are installing a new drive, go to step 7.
5 Disconnect the DC power cable and interface cable from the back of
the drive you are replacing.
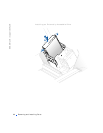
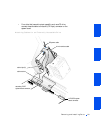
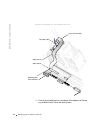
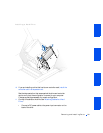
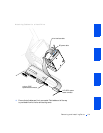
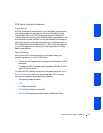
6 Remove the drive from the chassis drive bay.
a Squeeze together the tabs at each side of the drive to disengage
the drive bracket from the chassis.
b Slide the drive bracket upward, and remove it from the chassis (see
the following figure).