


13
Configuring Setup Setting
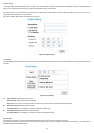
There are four items, including Port Settings, VLAN Settings, Trunk Settings, Mirror Settings and Static MAC in Setup menu.
Port Settings
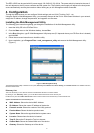
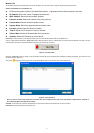
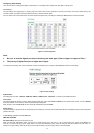
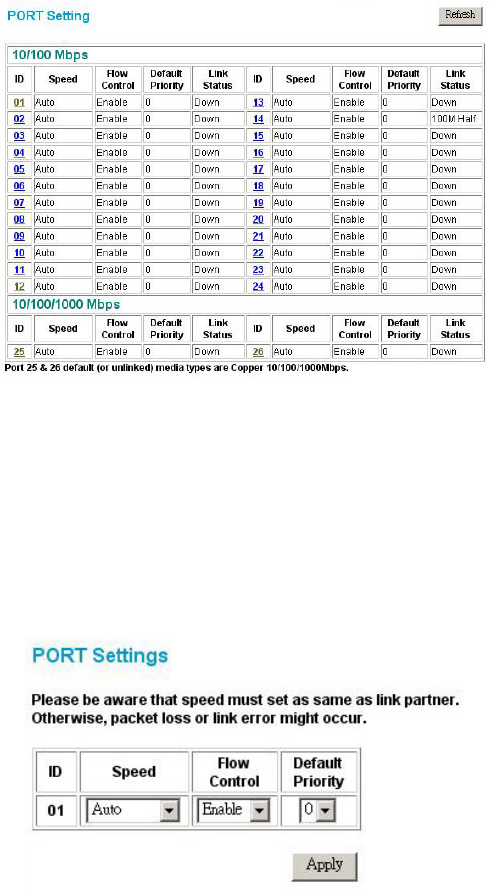
The Port Settings menu page (Figure 11) displays each port’s status. Click on the ID parameter to set each port’s Speed, Flow Control, Default priority, and
Link Status. When you need to renew the posted information, press the “Refresh” button.
The Link Status in the screen will show the connection speed and duplex mode. This dialog box will display down when the port is disconnected.
Figure 17. Port Configuration
Note:
1. Be sure to reset the Gigabit port when transferring the media type ( Fiber to Copper or Copper to Fiber ).
2. The priority of Gigabit Fiber port is higher than Copper.
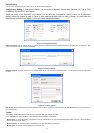
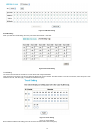
To change the port setting, click on the ID parameter to enter the selected port to configure its Speed/Disable and Flow control settings.
Figure 18. Port settings
Speed/Disable:
This setting has six modes—100M Full, 100M Half, 10M Full, 10M Half, Auto, and Disable—for speed or port disable selections.
Flow Control:
This setting determines whether or not the Switch will be handling flow control. Set FlowCtrl to Enable to avoid data transfer overflow. It is set to Disable
when there is either no flow control or other hardware/software management.
When the port is set to forced mode, the flow control will automatically be set to Disable.
Default Priority:
The Default Priority is specific the 802.1P QoS priority level to related port, all of the received data packet will follow the Default Priority level forwarding data
packet to other port.
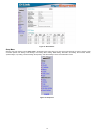
VLAN Settings (Virtual Local Area Network)
IEEE 802.1Q VLAN:
VID Table Setting: select the VID group that you set.
When you select VID Table Setting, press “Add new VID” to create new VID group, from port 01 ~ port 16, select Untag Port, Tag Port or Not Member for
each port. To save the VID group, press “Apply” button. To remove the selected VID group, select the VID group and press “Remove the VID” button. To
modify the VID group setting, select the VID group and change the setting, and press “Apply” button to save the settings.