


2
Initial IP configuration
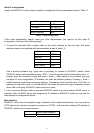
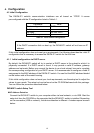
Initially the DKVM-IP1 switch network interface is configured with the parameters shown in Table 1-1.
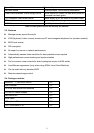
Parameter Value
IP auto configuration DHCP
IP-Address 192.168.0.70
Net-mask 255.255.255.0
Default-Gateway none
Table 1-1: Initial configuration
If this initial configuration doesn’t meet your local requirements, you need to do the initial IP
configuration. Use one of the following ways:
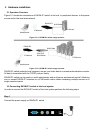
1. Connect the enclosed NULL modem cable to the serial interface on the rear side. The serial
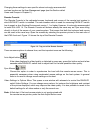
interface needs to be adjusted with the parameters shown in table 1-2:
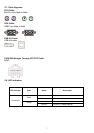
Parameter Value
Bits/second 115200
Data bits 8
Parity No
Stop bits 1
Flow Control None
Table 1-2: Serial parameters
Use a terminal software (e.g. hyper term or minicom) to connect to DKVM-IP1 switch. Reset
DKVM-IP1 switch and immediately press < ESC >. You will see some device information and a ’=>’
prompt. Enter the command ’config’ and press < Enter >. After waiting a few moments you may
configure IP auto configuration, IP address, net mask and default gateway. Pressing < Enter >
without entering values does not change settings. The gateway value must be set to 0.0.0.0 (for no
gateway) or any other value. You will be asked if the values are correct and get a chance to correct
them. After confirming, DKVM-IP1 switch performs a reset.
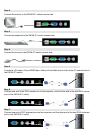
2. Use a crossover Ethernet cable to connect DKVM-IP1 switch to a subnet where a DHCP server is
available. After the DHCP server has assigned an IP address to DKVM-IP1 switch you can use the
web interface to configure the device.
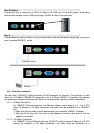
Web interface
DKVM-IP1 switch may be accessed using a standard JAVA enabled web browser. You may use the
HTTP protocol or a secure encrypted connection via HTTPS. Just enter the configured IP address of
DKVM-IP1 switch into your web browser.
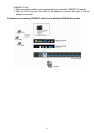
Login name
admin (factory default)
Password
admin (factory default)