


Sawgrass Technologies, Inc. ChromaBlast
™
Getting Started Guide for the EPSON Stylus C120/c110
10
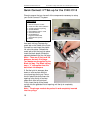
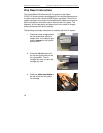
Quick Connect II™ Set-up for the C120/C110
Check to ensure that you have all of the components necessary to setup
your Quick Connect II™ system.
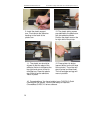
1. Remove the soft protective cap
from each ink bag. Depress the
metal tab on the inside of the Quick
Connect box and insert the plastic
ink valve into place. Release the
metal tab to lock the bag into place.
Insert the black plastic dividers to
separate between the four ink bags.
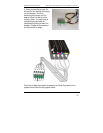
Note— There are 5 (five) bulk ink
dampers, but only 4 ink bags.
Two dampers are supplied by the
Black ink bag. The Black ink bag
has a “Y” tube splitter that fills
both black ink dampers.
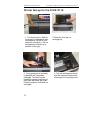
2. Set the bulk ink dampers face
down on a flat surface with the
round openings facing up. Pierce
the thin plastic tab that covers the
opening using the tip of a sharp
object such as a ball point pen.
Firmly insert the tip of the plastic
syringe into the gasketed round opening until the tip is completely
inserted.
Note – The plunger needs to be pushed in and completely inserted
into the syringe.
Components
1. Bulk Ink Dampers + tubes
2. Plastic Arm with Velcro adhesive
3. 4 plastic syringes for priming
4. 3 plastic dividers
5. ChromaBlast C120/C110 CD
6. QuickConnect Box
7. ChromaBlast Ink
bags(not included with
QuickConnect system)
8. Printer