


To clean the black print head:
1. Make sure the printer is turned on and press the
Pause
button.
2. Hold down the
Alt
button and press
Economy/Condensed
.
The cleaning cycle begins.
3. Press the
Pause
button.
After you clean the print heads, turn off the printer; then hold
down the
Alt
button as you turn the printer back on. This
prints a demonstration page so you can see if your print quality
has improved. (After the page prints, the
Pause
light comes
on; turn off the printer to exit demonstration mode.)
It can sometimes take up to five cleaning cycles to improve
print quality. If the print quality does not improve after you
clean the print heads five times (printing a demonstration page
to check after each cleaning), and you are sure the cartridges
are not low on or out of ink (as described in the next section),
contact your dealer or authorized EPSON servicer.
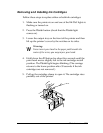
Replacing Ink Cartridges
The printer’s
Ink Out
O (black) and
Ink Out
NNN (color) lights
tell you when your ink cartridges are low on ink and when you
need to replace them. If one of these lights flashes, the
indicated cartridge is low on ink; if it remains on, you need to
replace the cartridge.
c
Caution:
❑
Do not replace an ink cartridge unless its
Ink Out
light
tells you to. If you replace a cartridge before its light
flashes, the sensor that tells you when ink is out will not
work with the new cartridge.
Maintenance
3-3