


R4CG25P
BasicOperationGuide Rev.C2
INK.FM A4 size
6/29/05
L
Proof Sign-off:
K. Yoda CRE kawakami
M.Otsuka
editor name
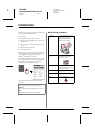
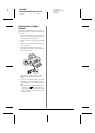
12 Replacing Ink Cartridges
Replacing Ink Cartridges
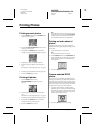
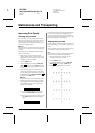
Checking the ink supply
When the ink is low, this icon H appears in the
upper-left of the LCD panel. Follow these steps to
check your ink supply.
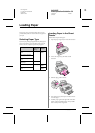
1. Press the Setup button.
2. Press the
l or r button to display Check Ink
Levels , then press the x Start button.
You see a graphic showing the amount of ink
available in each cartridge.
C (Cyan), M (Magenta), Y (Yellow), and BK (Black)
3. When you have done checking the ink levels,
press the x Start button.
When your ink starts getting low, make sure you have
replacement cartridges available. You can not print if
a cartridge is empty.
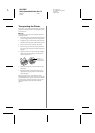
Precautions on ink cartridge
replacement
Read all of the instructions in this section before
replacing the ink cartridges.
w Warning:
If ink gets on your hands, wash them thoroughly with soap and water.
If ink gets in your eyes, flush them immediately with water. If you still
have discomfort or vision problems, see a doctor immediately.
c Caution:
❏ To avoid damaging the printer, never move the print head by
hand.
❏ When an ink cartridge is empty, you cannot continue printing
even if the other cartridges still contain ink.
❏ Leave the empty cartridge installed in the printer until you have
obtained a replacement. Otherwise the ink remaining in the print
head nozzles may dry out.
❏ To ensure good results, use genuine Epson ink cartridges and
do not refill them. Other products not manufactured by Epson
may cause damage that is not covered by Epson's warranties,
and under certain circumstances, may cause erratic printer
behavior.
❏ An IC chip on each ink cartridge accurately monitors the amount
of ink used from the cartridge. Even if a cartridge is removed and
then inserted again, all of its ink can be used. However, some
ink is consumed each time the cartridge is inserted because the
automatically checks its reliability.
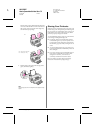
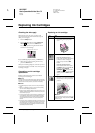
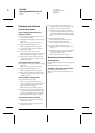
Replacing an ink cartridge
Appears when ink is low.
LCD Steps
1. Make sure that the printer is on but
not printing, then open printer
cover.
2. Do one of the following:
If an ink cartridge is empty:
Look at the icon on the LCD panel
to find out which cartridge is
empty, then press the x Start
button.
If an ink cartridge ink low:
Check the ink levels. Then press
the Setup button. Use the
l or r
button to select Change
Cartridges , then press the
x Start button. At the confirmation
screen, press the x Start button
again.
3. Press the x Start button and open
the printer cover. The ink cartridge
moves slowly to the replacement
position.
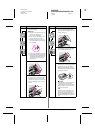
c Caution:
Do not move the print head by hand, as this may
damage the printer. Always press the
x Start
button to move it.