


CIA111 and CIA114 • Installation and Operation
Installation, cont’d
2-6
CIA111 and CIA114 • Installation and Operation
2-7
e
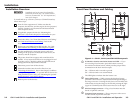
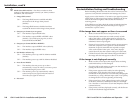
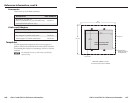
Mode Select DIP switches — Set these switches to select
settings for horizontal position control, sync format, monitor
emulation, and Auto Power.
1 — Image Shift control
On — The Image Shift button is enabled and shifts
the location of the image when pressed
(default).
Off — The Image Shift button is disabled and does
not shift the location of the image when pressed.
2 — Output sync format (sync on green)
On — The interface outputs RGsB video.
Off — The interface outputs RGBS or RGBHV video
(default). See switch 3, on page 2-6, to select
between RGBS and RGBHV.
3 — Output sync format (RGBS or RGBHV)
On — The interface outputs RGBHV video (default).
Off — The interface outputs RGBS video.
4 — No Monitor at Power Up
On — The interface powers up with No Monitor enabled
(default).
Off — The interface powers up with No Monitor disabled.
5 — Auto Power Disable
On — The interface does not power up or down
automatically; it stays on unless you remove power
by disconnecting the power cable.
Off — The interface powers up automatically when it
senses an input sync signal, and turns itself off
when the sync signal is removed.
6 — Not used
Pre-installation Testing and Troubleshooting
Before installing the interface into the wall or furniture, test the
system to verify that the connections and settings are correct.
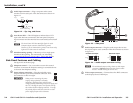
Apply power to the interface. If an active sync signal is present
on the input or if the auto-power feature is disabled, the Power
LED on the interface lights to indicate that the interface is
receiving power.
If the LED does not light, check the wiring at both the interface
and the power supply, and ensure that the power supply is
connected to a power source.
If the image does not appear or there is no sound
1. Make sure that all the devices are powered on.
2. Ensure that the connectors are wired correctly at both
ends of the cables. Audio cables must be wired for an
unbalanced stereo input signal and for a balanced or an
unbalanced stereo output signal.
3. If input is from a laptop computer and no picture appears,
check the computer’s user’s guide or contact Extron to
determine if special commands are required to output
video to the external video port. Also, many laptops’
screens shut off after the external video port is activated.
4. Call the Extron S
3
Sales and Technical Support Hotline if
the image still does not appear or there is no sound.
If the image is not displayed correctly
1. Make sure the correct input and output cables are being
used and that they are not damaged.
2. Check the DIP switch settings to make sure the interface is
putting out the correct sync format.
3. If the picture appears and is stable, but it has ghosting
or blooming, verify that the video input is properly
terminated. If the problem is not resolved by changing the
termination, try using a different input cable. Poor quality
or damaged cable can cause ghosting or blooming.
4. If the picture has a white, ghosted image on the right side
of the lines/characters, the sharpness may be set to high.
Use a Tweeker or screwdriver to turn the sharpness control
counterclockwise.
5. If the picture is still not displayed correctly, call the Extron
S
3
Sales and Technical Support Hotline.