2-7DVS 100 and DVS 150 Installation
7
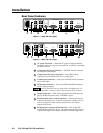
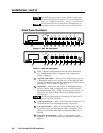
Contrast control button — Allows you to adjust the image
contrast. For more information, see “Adjusting an image” on
page 3-2.
8
Horizontal shift control button — Allows you to adjust the
horizontal shift. For more information, see “Adjusting an image”
on page 3-2.
9
Vertical shift control button — Allows you to adjust the vertical
shift. For more information, see “Adjusting an image” on
page 3-2.
10
Output rate control button — Allows you to choose the output
rate. For more information, see “Choosing the output rate” on
page 3-3.
11
Adjustment knob — With a control button selected, allows you to
make adjustments to the feature controlled by the button. For
example, if the horizontal shift control button is selected, turning
the adjustment knob moves the image to the right or left.
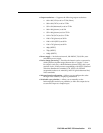
Configuring the Scaler
The LCD on the front panel of the scaler provides access to a menu that
allows you to configure the scaler. To access the menu, press the input
selection button and the rate button simultaneously, and hold them for
two seconds. The Autoswitch menu appears in the LCD.
To step through the menus, press the input selection button.
To exit the menu, step through the menus until the Detail menu appears,
and then press the input selection button one more time. Or, wait eight
seconds without pressing any buttons or turning the adjust knob, and
the menu reverts to the default screens.
Configuration settings
Autoswitch (AUTOSW) — If set to On, automatically selects the input
source that uses the highest video quality. If set to Off, allows you
to manually specify the input source by pressing the input button
on the front panel. To toggle between On and Off, turn the
adjustment knob while the Autoswitch menu is displayed. By
default, autoswitch mode is Off.
Top blanking (TOPBLANK) — Removes noise and unwanted
information, such as tape head switching and closed captions,
from the top of the screen. To change the top blanking level, turn
the adjustment knob while the Top blanking menu is displayed,
until the unwanted information no longer appears.
Bottom blanking (BOTBLANK) — Removes noise and unwanted
information, such as tape head switching and closed captions,
from the bottom of the screen. To change the bottom blanking
level, turn the adjustment knob while the Bottom blanking menu
is displayed, until the unwanted information no longer appears.
Horizontal sync polarity (H-SYNC) — Changes the polarity of the
horizontal sync signal to allow any projector to distinguish the
scaler input from a standard RGB input. To toggle between
Positive and Negative, turn the adjustment knob while the
Horizontal sync menu is displayed. By default, the horizontal
sync polarity is set to Negative.


