


Quick Start — DVS 100 and DVS 150, cont’d
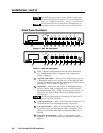
Configuring the Scaler
Configuring the scaler: Press the input and rate buttons simultaneously, and hold them for two
seconds.
Stepping through the LCD display menus: Press the input selection button.
Changing a selection: Turn the adjustment knob while the menu is displayed.
Exiting the menus: Press the input selection button while the Detail menu is displayed, or don’t press
any buttons or turn any knobs for eight seconds.
AUTOSW — Choose whether the DVS automatically selects the active input.
On: The DVS selects the active input automatically. Off: You select the input manually.
TOPBLANK — Add or remove additional blanking lines at the top of the image.
BOTBLANK — Add or remove additional blanking lines at the bottom of the image.
H-SYNC — Change the polarity of the horizontal sync signal to allow any projector to distinguish the
DVS 100 or DVS 150 input from a standard RGB input.
+: Sets the horizontal sync polarity to positive. -: Sets the horizontal sync polarity to negative.
V-SYNC — Change the polarity of the vertical sync signal to allow any projector to distinguish the
DVS 100 or DVS 150 input from a standard RGB input.
+: Sets the vertical sync polarity to positive. -: Sets the vertical sync polarity to negative.
SOG — Set the sync output format.
Yes: Sync on green (RGsB) output. No: RGBS or RGBHV output (based on unit cabling).
STILL — Enhance output for still or motion video.
On: Enhanced image for still video and text. Off: Enhanced image for motion video.
DETAIL — Apply a filter to improve image detail.
1: Low level of detail. 2: Medium level of detail. 3: High level of detail.
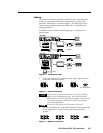
Operation
Choosing the input source: Press the input selection button until the desired input LED lights.
If input 4 (RGB pass-through) of the DVS 150 is selected, you cannot make any of the following
adjustments.
Adjusting the image: Press the button for the adjustment, and rotate the adjustment knob until the
desired result is achieved.
Choosing the output rate: Press and hold the rate button for two seconds, and then rotate the
adjustment knob until the desired rate appears in the LCD display. Options are:
640x480 (VGA), 60/75 Hz 848x480 (plasma), 60 Hz 1280x768 (plasma), 56 Hz 480p (HDTV)
800x600 (SVGA), 60/75 Hz 852x480 (plasma), 60/75 Hz 1280x1024 (SXGA), 60 Hz 720p (HDTV)
832x624 (Mac), 60/75 Hz 1024x768 (XGA), 60/75 Hz 1360x765 (plasma), 60 Hz 1080p (HDTV)
Activating freeze mode: Issue the RS-232 freeze mode command.
Deactivating freeze mode: Press the input selection button or issue an RS-232 command.
Restoring default picture control settings (active input): Press and hold the input selection button for
two seconds.
Restoring all settings to factory defaults: Press and hold the input selection button while attaching
the AC power cord.