


3-1
3. FAX OPERATION: NavNet 3D, PC
3.1 Automatic Receiving
3.1.1 Starting receiving
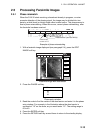
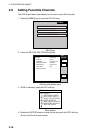
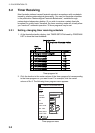
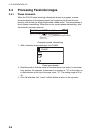
1. At the facsimile standby display, click CHANNEL SETUP on the top menu.
CHANNEL SETUP
FREQUENCY
03622.5 kHz
RCV STOP
ZONE
STATION
CHANNEL
OK
< back
1: NORTHWEST PACIFIC
0: JMH/TOKYO 1
AUTO
Channel setup menu
2. Click the arrow button on ZONE and choose desired zone.
3. Click the arrow button on STATION and choose desired station. See page
AP-2 for station number.
4. Click the arrow button on CHANNEL and choose desired channel. Choose
AUTO if you are unsure of channel. (Most stations transmit the same
message over several frequencies, so if you are unsure of the channel
choose AUTO.)
5. If necessary you may fine-tune the frequency. Click anywhere inside the
FREQUENCY box and enter frequency. For a PC, enter numeric value from
the keyboard.
6. Click OK and then click “<back” or Back button to return to the top menu.
Then, the FAX-30 will receive the next scheduled broadcast from the station
selected. When the FAX-30 receives the start signal from the facsimile station it
automatically adjusts itself to match speed, IOC (Index of Cooperation) and
phase of the station’s transmitter. Facsimile images are received, taking 30-40
minutes to receive depending on the size of the image. After a facsimile image is
received it is compressed and stored in the image memory and then posted on
the facsimile standby display screen. This process takes 3-5 minutes.
3.1.2 Stopping receiving
You may stop receiving at any time by doing the following:
1. At the facsimile standby display, click CHANNEL SETUP on the top menu.
2. Click RCV STOP.