


GN-A16B Wireless Access Point User Guide
Follow these steps to install the Wireless Access Point.
Hareware Installation
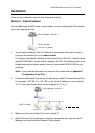
1. Choose a proper place for Access Point. In general, the best location is at the center
of your wireless coverage area, within line of sight to all wireless devices. Keeping
clear of metal obstructions and away from direct sunlight.
2. Place the Access Point in the desired location. Normally, the higher you place the
antenna, the better the performance will be. The antenna’s position enhances the
receiving sensitivity.
3. Attach one end of an RJ-45 Ethernet cable to the Access Point and attach the other
end to a network hub, switch, router, or patch panel (possibly on a wall).
4. Attach one end of the AC power adapter to the Access Point and the other end to a
power outlet. (Note: Only use the power adapter supplied by Gigabyte in the product
package. Using a different adapter may result in product damage.)
For the average home, signal range should not be an issue. If you experience low or no
signal strength in areas of your home that you wish to access, consider positioning the
Access Point in a location directly between the computers with wireless adapters. Addi-
tional Access Points can be connected to provide better coverage in rooms where the
signal does not appear as strong as desired.
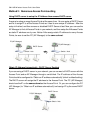
Wired Ethernet Cable
Connect to Access Point
You can connect a LAN cable from your computer’s Network card to the Access Point
without using a Network switch or hub.
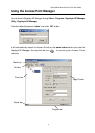
Wireless Connection
If you are using the wireless connection, you can connect to the Access Point using the
Gigabyte Access Point Manager without a wired Ethernet cable.