


Installation and Setup
6 3A0415D
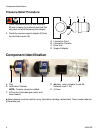
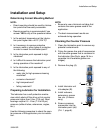
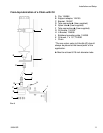
A pressure manometer is a simple device that
measures pressure output. To build a pressure
manometer you need a pressure gage (aa),
tee fitting (bb) and stop valve (cc). FIG. 1
shows a correctly assembled pressure
manometer, connected to the lubricator and a
lubrication point.
7. Ensure the stop valve (cc) of the pressure
manometer is open.
8. Attach lubricator and adapter (B) to the
pressure manometer (aa - cc) and turn the
switch to “ON” (ff) (F
IG. 1).
9. Run the manometer for about 20 seconds.
Observe the gauge and repeat this proce-
dure until the pressure registered on the
gauge stays constant.
10.To determine the counter pressure, wait
approximately 5 minutes until the system
has relaxed. Do one
more discharge by
turning the unit OFF; then ON again until it
dispenses for no more than 5 seconds.
11.Wait approximately 5 more minutes to
make sure the system does not lose pres-
sure and remains constant.
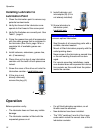
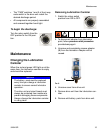
12.To disconnect lubricator from manometer,
follow pressure relief procedure provided
on page 4.
NOTE: In this application, you will be dis-
connecting adapter (B) from manometer
instead of lubrication point.
13.If the counter pressure is 5 bar (72.5 psi) or
higher, flush the lubrication point with a
grease gun.
If the counter pressure does not decrease
you may need a different lubricant or size
lubricator canister. Contact Graco Cus-
tomer service for assistance.
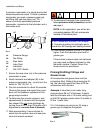
Priming/Prefilling Fittings and
Grease Lines
All accessories and grease lines must be
primed/pre filled. Without this priming/pre fill-
ing, the lubricator would first have to fill the
accessories with lubricant.
Example: A tube that is one meter long
requires about 28 cm
3
of lubricant. It would
take the lubricator with a 12 month setting and
an EM-120 grease canister about 3 months to
fill this 1 meter tube.
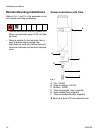
F
IG. 2 illustrates one way to pre fill using a
grease gun to dispense the grease.
FIG. 1
aa
Pressure Gauge
bb
Tee Fitting
cc
Stop Valve
dd
Lube Point
ee
Lubricator
ff
ON / OFF Switch
aa
bb
cc
dd
ee
ff
NOTICE
Do NOT disconnect lubricator from adapter
(B). Screwing anything into lubricator end a
second time will damage self-sealing threads.
FIG. 2