


Installation and Setup
3A0415D 9
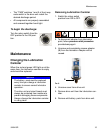
Changing the Dip Switch Setting
The discharge period (Time) and/or lubrication
canister size (Volume) can only be changed
when a new lubrication canister is attached. If
settings must be changed during current oper-
ation; i.e., after discharge was started, you
must attach a new, completely filled lubrication
canister and a new battery pack.
Changing settings during operation interferes
with the controls and monitoring electronics;
making it impossible to guarantee precise
lubrication.
Always use a new, completely full
lubrication canister and new battery pack
after each setting change. Never use a
partially empty lubrication canister or old
batteries.
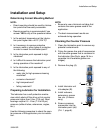
Selecting Mounting Location
Installation Guidelines
• Before installing the lubricator, the lubrica-
tion points and any extensions must be
adequately pre-lubricated with the same
lubricant contained in the lubricator. A 400
gram lubricant cartridge for grease guns is
available from Graco. See Parts, page 16
for a complete list of available lubricant car-
tridges.
• Install one lubricator per lubrication point.
• When oil is used for lubrication, a
non-return valve (oil throttle) must be
installed. This will prevent oil leakage from
the lubricator. An oil throttle, part number
124102 is available from Graco. See Parts,
page 16.
• An oil-filled lubricator must be installed ver-
tically (outlet down).
• For horizontal mounting a bracket clip must
be used to hold the lubricator in place. A
horizontal clip bracket part number 124086
is available from Graco. See Parts, page 16
• For vertical installations always use a sup-
port adapter part number 124105 is avail-
able from Graco. See Parts, page 16.
• The grease nozzle of the lubricator has a
npt 1/4 inch male thread. If your application
has a different thread you may need to use
an adapter. See Parts, page 16 for a com-
plete list of available adapters.
• Do not overtighten the plastic thread of the
lubricator.
• For all metal to metal connections (i.e.,
extensions, reducers, etc.) make sure to
use LOCTITE
®
243* (semi-tight screw lock-
ing).
*Loctite
®
is a registered trademark of the Loctite
Corporation.
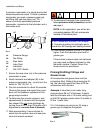
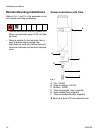
Direct Mounting Installation
Refer to FIG. 6 for examples of correct and
incorrect direct mounting installations.
FIG. 6
Correct
Incorrect