


62
Keyboard
(HP Authorized Service Providers Only)
Required Equipment
• Appropriate ESD station
• Torx #6 screwdriver
• Two small flat tip screwdrivers (or similar prying devices)
• Probe
Removal Procedure
1. Follow the Display Removal Procedure to separate the Display and Top Case from the
Bottom Case.
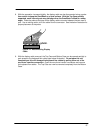
2. Once the Display is removed, the Keyboard must now be separated from the Top Case.
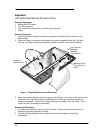
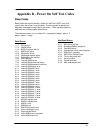
Hold the Top Case and Keyboard Assembly exactly as shown in the below illustration.
3. Apply even upward pressure with the fingers of the left hand. At the same time use the tip of
the thumb of the right hand to twist the backside of the Top Case icon panel inward and
toward the keyboard. There will be a slight bending in the plastic of the Top Case. This is
normal and will not damage the assembly.
Replacement Procedure
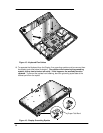
1. To replace the Keyboard, snap it into the Top Case. Ensure the entire perimeter of the
Keyboard is securely snapped into place.
2. Follow the Display Replacement Procedure to replace the Display and remaining
components.
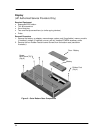
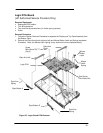
Figure - Keyboard Removal Hand Placement
Top Case and
Keyboard
Assembly
(upside down)
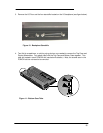
Backside of the
Top Case icon
panel.
Keyboard
(upside down)