


Cold-Installing HP-UX 11i v2
Cold-installing HP-UX 11i v2
Chapter 5 83
Cold-installing HP-UX 11i v2
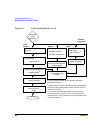
To cold-install the operating system, use the following steps. Please note
that cold-installing overwrites everything on the target disk. You should
review the Appendix B, “Known Problems and Troubleshooting,” on
page 145 to see if any installation issues apply to your system.
Step 1. Make sure any external devices connected to the target system are
turned ON and operational.
Step 2. Insert the HP-UX 11i v2 DVD into the drive.
Step 3. Turn the system ON, reboot, or cycle power. The system should boot
automatically from the DVD.
• If the system boots automatically, go to step 4.
• If the system does not boot automatically, it goes to the boot menu. It
is a timed menu; press any key to stop the timer. Then, you can run
the install manually from the EFI shell using the following steps:
a. From the boot menu, select EFI Shell (Built In).
b. The list of devices displays automatically, and the install process
selects the device for you.
c. If the device is not automatically selected, select the device name for
the CDROM and then execute install. For example, from the EFI
shell prompt, you may see something similar to the following:
Shell> fs1:
fs1:\> install
If you do not see the CDROM device, use the map command to list all
device names from the EFI shell prompt.
NOTE Your DVD device may not always be fs1. Make sure you verify the
ID appropriate with your DVD device.
Step 4. Once the kernel has booted, it scans the system for I/O devices.