


32
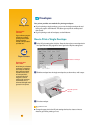
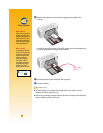
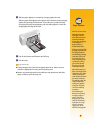
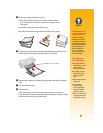
ẅ Put the transparencies in your printer with the rough side down and the adhesive
strip forward. (You can peel off the adhesive strip after printing.)
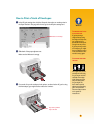
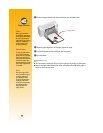
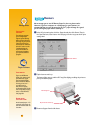
Ẇ Slide in the paper adjusters, just as you would for plain paper. Push the IN drawer
back in and flip the OUT tray down.
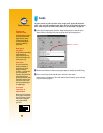
ẇ Print the transparency.
Ẉ Be patient.
Because the printer uses more ink, lays the colors down more slowly, and allows
for a longer drying time between sheets, transparencies take a while to print.
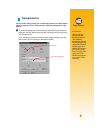
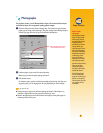
■ Change the paper type in the HP print settings box back to Plain Paper or to
whatever is appropriate for what you’ll be printing next.
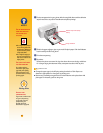
■ Remove any remaining transparencies from the IN drawer and replace them with
plain paper or whatever you’ll be using next.
Adhesive strip forward, tape
side up
Rough side down
A FTER P RINTING
What If
THE INK NEVER DRIES OR
THERE ARE CRACKS IN
THE SOLID BLOCKS
OF COLOR
❚ You might have printed
on the wrong side of the
transparency. Make sure
to put it into the printer
rough side down.
❚ You might be trying to
print on a transparency
that wasn’t meant for an
inkjet printer.
THE QUALITY ISN’T WHAT
YOU WERE EXPECTING
You might not have
chosen the right paper
type and print quality.
Follow the steps in the
procedure above, and try
printing again.
Handy Hints
PROTECT YOUR
TRANSPARENCIES
If you want to make notes
on your transparency
as you talk, print the
transparency as a
flipped document
(described on page 18).