


Chapter 4. Integrating with Netcool/OMNIbus 43
Adding the menu to the Netcool/Webtop desktop
Before you can add the visualization menu option to Netcool/Webtop, you must have
Netcool/Webtop 1.1 and the latest patches installed. For information about how to do this,
see the Netcool/Webtop Administration Guide. Once the product is installed, you need to
follow the steps described in "Configuring the Netcool/OMNIbus ObjectServer version 3.6"
on page 36.
To add the Visualize menu option to Netcool/Webtop:
1. Find the visualize.zip file in the
<netcool_install_dir>/etc/precisiontn/webtop directory and copy it to
the Netcool/Webtop installation directory.
2. Unzip visualize.zip in the Netcool/Webtop installation directory.
3. Open the Netcool/Webtop Administration page and click on the Content tab.
4. Expand the Menus & Tools section and click on Menus.
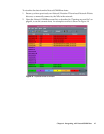
5. Select a menu to add the Visualize tool to (for example, "alerts") and then click on the
Modify menu.
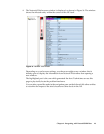
6. In the resulting pop-up window, select Visualize from the selection box on the left.
7. Click the <- Add button.
8. Click the Ok button.
Visualizing alerts in a desktop
This section describes the process of starting the components that are used when
visualizing alerts. It also describes the operation of the visualization menu option to display
data.
Starting the components
When using Netcool/Precision TN visualization with Netcool/OMNIbus:
• You must start the ObjectServer before you start the Netcool/Precision TN server.
• If you are using Netscape as your web browser you must start Netscape before you
start the Netcool/Precision TN server.
• Netcool/Precision TN uses Netcool/OMNIbus security, so you must log in to
Network Pilot using the Netcool/OMNIbus root user name and password.
See the Netcool
®
/OMNIbus
™
Administration Guide if you need additional instructions on
how to start the Netcool/OMNIbus ObjectServer. For instructions on how to log in to the
event list, see the Netcool
®
/OMNIbus
™
User Guide.