


Removing
and
replacing
a
CD-ROM,
CD-RW,
or
DVD
optical
drive
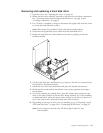
1.
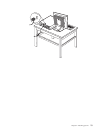
Open
the
cover.
See
“Opening
the
cover”
on
page
10.
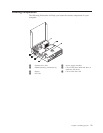
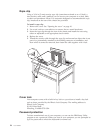
2.
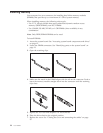
Rotate
the
drive
bay
assembly
upward
to
gain
access
to
the
cable
connections.
See
“Accessing
system
board
components
and
drives”
on
page
12
and
“Locating
components”
on
page
11.
3.
Disconnect
the
signal
and
power
cables
from
the
drive.
Note:
Blue
straps
are
provided
to
help
when
disconnecting
cables.
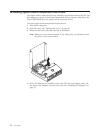
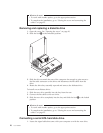
4.
Slide
the
lock1to
the
unlocked
position.
5.
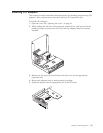
Open
the
door
at
the
front
of
the
drive
and
slide
it
out
the
front
of
the
computer.
6.
Install
the
new
drive
into
the
bay.
7.
Slide
the
lock
1to
the
locked
position
and
close
the
door
at
the
front
of
the
drive.
8.
If
you
are
replacing
an
existing
drive,
place
the
master/slave
jumper
on
the
drive
in
the
same
position
as
on
the
drive
being
replaced.
If
you
are
installing
an
additional
drive,
place
the
master/slave
jumper
on
the
drive
so
that
it
is
a
slave.
Also
refer
to
any
instructions
that
come
with
the
drive.
9.
To
connect
the
drive,
go
to
“Connecting
an
IDE
drive”
on
page
21.
What
to
do
next:
v
To
work
with
another
option,
go
to
the
appropriate
section.
v
To
complete
the
installation,
go
to
“Closing
the
cover
and
connecting
the
cables”
on
page
25.
18
User
Guide