


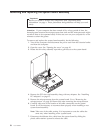
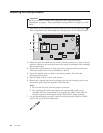
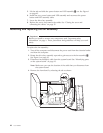

5.
Lift
the
tab
and
slide
the
power
button
and
LED
assembly2out.
See
Figure
1
on
page
43.
6.
Install
the
new
power
button
and
LED
assembly
and
reconnect
the
power
button
and
LED
assembly
cable.
7.
Lower
the
drive
bay
assembly.
8.
Replace
the
cover,
and
connect
the
cables.
See
“Closing
the
cover
and
connecting
the
cables”
on
page
25.
Removing
and
replacing
the
fan
assembly
Important
Before
you
install
or
remove
any
component,
read
“Important
safety
information”
on
page
v.
These
precautions
and
guidelines
will
help
you
work
safely.
To
replace
the
fan
assembly:
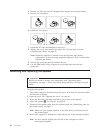
1.
Turn
off
the
computer
and
disconnect
the
power
cord
from
the
electrical
outlet
and
from
the
computer.
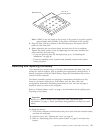
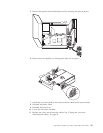
2.
Rotate
the
drive
bay
assembly
upward
to
gain
access
to
the
fan
assembly3.
See
Figure
1
on
page
43.
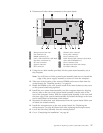
3.
Disconnect
fan
assembly
cable
from
the
system
board.
See
“Identifying
parts
on
the
system
board”
on
page
13.
Note:
Make
sure
you
note
the
location
of
the
cable
that
you
disconnect
from
the
system
board.
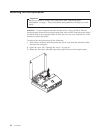
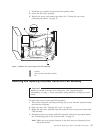
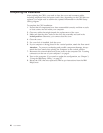
4.
Remove
the
front
bezel
by
releasing
the
tab
as
shown.
44
User
Guide