


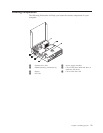
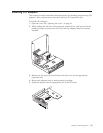

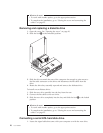


Removing
and
replacing
a
hard
disk
drive
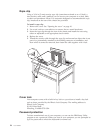
1.
Open
the
cover.
See
“Opening
the
cover”
on
page
10..
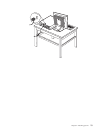
2.
Rotate
the
drive
bay
assembly
upward
to
gain
access
to
the
cable
connections.
See
“Accessing
system
board
components
and
drives”
on
page
12
and
“Locating
components”
on
page
11.
3.
If
a
CD
drive
is
installed,
it
helps
to
disconnect
the
signal
cable
from
the
drive
to
access
the
hard
disk
drive
cables.
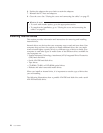
Note:
Blue
straps
are
provided
to
help
when
disconnecting
cables.
4.
Disconnect
the
signal
and
power
cables
from
the
hard
disk
drive.
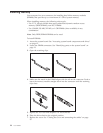
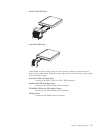
5.
Rotate
the
hard
disk
drive
and
bracket
to
the
rear
by
pulling
on
the
blue
handle
provided.
6.
Lift
the
hard
disk
drive
and
bracket
up
to
remove.
The
drive
is
removed
from
the
bracket
by
flexing
the
bracket.
7.
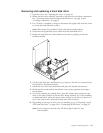
Install
the
new
drive
into
the
bracket
and
place
the
bracket
into
the
slot.
8.
Rotate
the
drive
and
bracket
towards
the
front
of
the
computer
and
snap
it
into
position.
9.
If
you
are
replacing
an
existing
drive,
place
the
master/slave
jumper
on
the
drive
in
the
same
position
as
on
the
drive
being
replaced.
If
you
are
installing
an
additional
drive,
place
the
master/slave
jumper
on
the
drive
so
that
it
is
a
slave.
Also
refer
to
any
instructions
that
come
with
the
drive.
10.
Depending
on
the
type
of
drive
you
are
installing,
go
to
“Connecting
a
serial
ATA
hard
disk
drive”
on
page
20
or
“Connecting
an
IDE
drive”
on
page
21.
Note:
Do
not
forget
to
reconnect
the
CD
drive
signal
cable
if
it
was
disconnected.
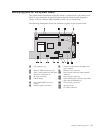
Chapter
2.
Installing
options
19