


•
•
•
•
•
•
•
•
•
•
•
•
•
•
•
•
•
•
•
•
•
•
•
•
•
•
•
•
•
•
•
•
•
•
•
•
•
•
•
•
•
•
•
•
•
•
•
•
•
•
•
•
•
•
•
•
•
•
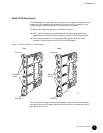
FPC Installation Instructions
11
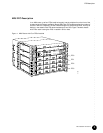
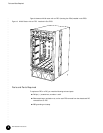
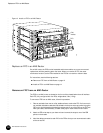
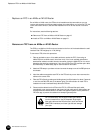
Replace an FPC in an M20 Router
3. Grasp the front of the FPC with both hands and align the rear with the guides at the sides
of the FPC slot in the chassis.
4. Slide the FPC straight into the card cage until it contacts the midplane.
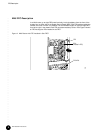
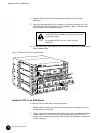
5. Push the ends of the extractor clips, located at the left and right ends of the FPC, inward
toward the face of the FPC. See Figure 8.
6. Tighten the thumbscrews at the left and right ends of the FPC.
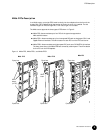
7. If any of the PICs on the FPC use fiber-optic cable, remove the rubber safety cap from
each transceiver and the end of each cable.
8. Insert the appropriate cables into the cable connector ports on each PIC on the FPC.
Secure the cables so that they are not supporting their own weight. Place excess cable
out of the way in a neatly coiled loop, using the cable management system. Placing
fasteners on a loop helps to maintain its shape.
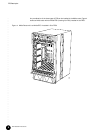
9. If installing multiple FPCs, repeat Steps 2 through 8 for each one. Wait 30 seconds after
installing each FPC to allow the FPC and PICs to come online.
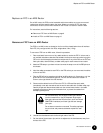
When about 1 in. (2.5 cm) of the FPC remains outside the
slot, adjust the insertion speed so that it takes between 1
and 15 seconds for the FPC to contact the midplane.
Completing the insertion too quickly or too slowly can
cause the router to reset.
Do not look directly into the ends of fiber-optic cables or
into the transceivers on the PIC faceplate. Single-mode
fiber-optic cable and the PICs that use it (such as ATM and
SONET/SDH interfaces) emit laser light that can damage
your eyes.
Do not let cable hang free from the connector. Do not
allow fastened loops of cable to dangle from the ladder
rack, because this stresses the cable at the fastening point.
Avoid bending fiber-optic cable beyond its minimum bend
radius. An arc smaller than a few inches in diameter can
damage the cable and cause problems that are difficult to
diagnose.