


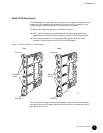


Replace an FPC in an M40e or M160 Router
•
•
•
•
•
•
•
•
•
•
•
•
•
•
•
•
•
•
•
•
•
•
•
•
•
•
•
•
•
•
•
•
•
•
•
•
•
•
•
•
•
•
•
•
•
•
•
•
•
•
•
•
•
•
•
•
•
•
FPC Installation Instructions
18
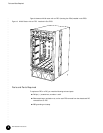
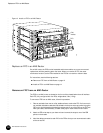
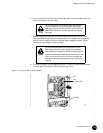
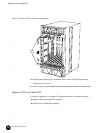
Figure 11: Remove an FPC from an M40e or M160 Router
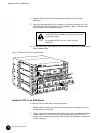
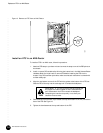
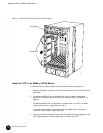
Install an FPC in an M40e or M160 Router
To install an FPC in an M40e or M160 router, follow this procedure (see Figure 12):
1. Attach an ESD strap to your bare wrist and connect the strap to one of the ESD points on
the chassis.
2. If installing an M40e-FPC, you must install PICs into it now, before installing the
M40e-FPC in the chassis. See the instructions in “Replace a PIC in an M40e-FPC” on
page 20.
If installing an M40e-FPC1 or M40e-FPC2 in an M40e router or any FPC in an M160
router, wait to remove or replace PICs until Step 7.
If any PICs already installed in the FPC use fiber-optic cable, make sure that each
transceiver is covered with a rubber safety cap.
3. Verify that the ends of the ejector levers, which are located at the top and bottom of the
FPC, are pushed outward, nearly perpendicular to the face of the FPC.
1191
R
Offline button
Ejector levers