


A-61662 October 2011 3-1
3 Getting Started
Contents Getting your scanner ready to scan................................................ 3-1
Making scanner adjustments .......................................................... 3-1
Getting your documents ready to scan ........................................... 3-2
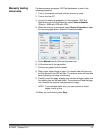
Manually feeding documents ..........................................................3-3
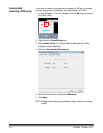
Accelerated scanning (VRS only) ...................................................3-4
Getting your scanner
ready to scan
1. Press the power switch on the back of the scanner to On (I). The
control panel indicators will blink a test sequence and the power
mode indicator will flash until scanner initialization is complete.
2. After the power mode indicator on the control panel is a steady
green, turn on your PC (for SCSI connection only).
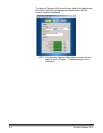
NOTE: For more information regarding the control panel, the Ngenuity
Operator Control and various scanning modes, see Chapter 4.
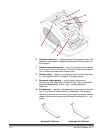
Making scanner
adjustments
Before scanning documents, you may need to adjust your side guides,
feeder table extender and exit deflector to accommodate the size of the
documents you are scanning.
• The side guides on the feeder table can be moved in and out to
accommodate the size of the documents you are scanning.
• If you are scanning documents longer than 11 inches (279.4 mm),
pull the feeder table extender out. The feeder table extender will
support documents up to 15 inches (381 mm) long.
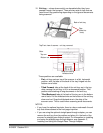
• To handle longer paper in the exit tray, pull out the exit tray extender.
Adjust the position of the exit tray extender so that it will
accommodate the length of the documents. The exit tray extender is
adjustable to 17 inches (432 mm). When scanning a document
longer than 17 inches (432 mm) or A3 size (420 mm), fold down the
exit tray extender so that the longer paper will fit in the exit tray.
• If you are feeding thick documents you can use the optional straight
pass-through adapter to aid in more efficient document feeding and
stacking. See Appendix C, Installing and Using the Straight Pass-
Through Adapter for more information.