


12
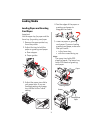
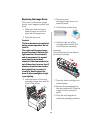
Replacing the Image Drum
The printer contains four image
drums: cyan, magenta, yellow, and
black.
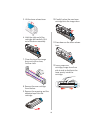
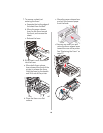
1. Make sure that you have a
sheet of paper on which to
place the old image drum.
2. Open the top cover.
Caution!
The fuser becomes extremely hot
during normal operation. Do not
touch it.
The surface of the green image
area of the drum is delicate and
light sensitive. Do not touch it,
and do not expose it to normal
room light for more than 5
minutes. If the drum needs to be
out of the printer for more than 5
minutes, wrap the drum inside a
black plastic bag to protect it
from light. Never expose the
drum to direct sunlight or bright
room lighting.
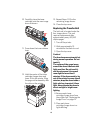
3. Hold the center of the toner
cartridge/image drum and lift
it out of the printer.
4.
Place the
toner
cartridge/image drum
on a
sheet of
paper.
5. Lift the toner release lever.
6. Hold the right end of the
cartridge and carefully lift it
out of the drum assembly.
Important!
Avoid spilling toner. Do not shake or
jar the toner cartridge.
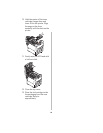
7. Place the toner cartridge on a
sheet of paper.
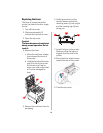
8. Remove the packaging from
the new image drum. Place the
image drum on a sheet of
paper.
9. Place the old image drum
inside the packaging material.