


Chapter 3 Printer Driver Functions
3-39
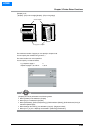
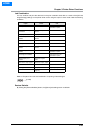
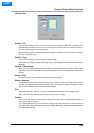
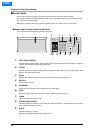
[Overlay] Tab
Symbol - File
You can select a bitmap file to use from the list shown by clicking the [▼] button. The bitmap files
selected before will appear in the list in order of using (the top of the list is a most recently used file). If
you've not selected any file, this will say [None].
Select a file from this list or click the [Select bitmap] button to navigate through your system's hard disk
to locate a bitmap file to use.
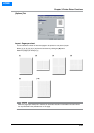
Symbol - Page
You can choose a page on which to place the overlay design.
Select [All but first page], [All pages], [First page only] or [No overlay] from the list shown by clicking the
[▼] button.
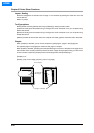
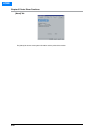
Symbol - Select bitmap
When you click the [Select bitmap] button, the [Open overlay file] dialog box will appear. Select a suit
-
able bitmap file for the overlay from your system's directories and click the [OK] button to load the bit
-
map file.
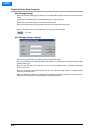
Shade - Color
This function is used only for black and white (monochrome) bitmaps.
Shade - Darkness
You can define with the slider or numerical entry box how "dark" or "solid" your overlay will be. A setting
of 100% is a completely solid overlay, a setting of 50% provides equal overlay to background cover
-
age, and lesser settings make the overlay more transparent.
Size
When [Automatically] is selected, a symbol you selected will be resized to 30% of the page size.
When [User defined] is selected, you can set the overlay size on the page.
Position
You can control the position of the overlay on the page manually or leave it at the automatic setting and
let the driver position it for you.
If you select [User defined], you can define the X axis position (left and right) and Y axis position (up
and down) of the overlay on the page by clicking the [▲] or [▼] button or by directly entering the values
from the keyboard (0-100).
HOME