


EDS User Guide 147
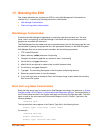
16: VIP Settings
VIP (Virtual IP) takes advantage of the Lantronix ManageLinx technology that solves the access-
through-firewall problem. ManageLinx utilizes existing network infrastructure to create a virtual
device network (VDN). The VDN provides direct access to only authorized equipment, behind
firewalls, from anywhere via the net.
ManageLinx is a secure and totally transparent remote access solution. The VDN technology
enables you to create dedicated TCP/IP connections between any two devices, using easily
deployed hardware appliances. There is no client software to install. No changes are required to
network software or applications at either end of the connection.
The VDN hardware consists of a publicly accessible Device Services Manager (DSM) and
individual Device Services Controller (DSC) appliances in multiple locations. Together, these two
components enable you to set up and manage individual Virtual IP (VIP) addresses and routes.
The EDS, with VIP enabled, takes the place of a DSC and provides direct access to your
equipment.
The EDS supports both Accept and Connect Mode tunneling through VIPs. Configuring an EDS to
use VIP Access involves:
Obtaining a Bootstrap File
Importing the Bootstrap File
Enabling VIP
Configuring Tunnels to Use VIP
Once the EDS is configured and enabled to use VIPs, it will immediately attempt to establish a
conduit with the ManageLinx DSM. Once the conduit is up, tunneling via VIP Access is ready to
go. This chapter also contains the following VIP sections:
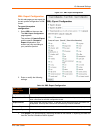
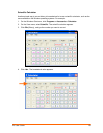
Virtual IP (VIP) Statistics
Virtual IP (VIP) Counters
Virtual IP (VIP) Configuration
Obtaining a Bootstrap File
The ManageLinx XML bootstrap file is an XML file that contains the information required to contact
and authenticate to a DSM. This file must be generated and sent to you by the DSM administrator.
See the ManageLinx documentation for more details.
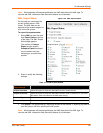
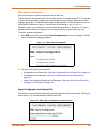
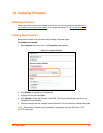
Importing the Bootstrap File
To configure an EDS to use VIP Access, import the bootstrap file as you would any XML
Configuration Record (XCR). For instructions on importing XCRs see Advanced Settings (on page
134).