


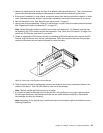

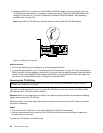

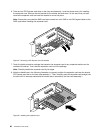
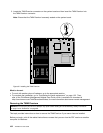

8. Position the TR 700 Battery above the ThinkServer RAID 700 Adapter so that the board-to-board
connector 1 on the bottom of the TR 700 Battery is aligned with the connector 2 on the ThinkServer
RAID 700 Adapter; and the three mounting studs on the bottom of the TR 700 Battery are aligned with
the corresponding holes in the ThinkServer RAID 700 Adapter. Carefully press the TR 700 Battery onto
the ThinkServer RAID 700 Adapter until the two connectors (
1 and 2 ) are rmly joined. Then, install the
three screws that come with the TR 700 Battery option kit to secure the TR 700 Battery in place.
Notes:
• Center the screwdriver when you install the screws and do not over-tighten the screws to avoid
possible damage to any parts.
• Do not touch the board on the bottom of the TR 700 Battery.
Figure 59. Installing the TR 700 Battery
9. Install the ThinkServer RAID 700 Adapter with the TR 700 Battery on the riser card assembly 1. See
“Replacing the RAID card” on page 139
.
10. Reinstall the riser card assembly 1. See “Replacing the riser card assembly 1” on page 135.
What to do next:
• To work with another piece of hardware, go to the appropriate section.
• To complete the installation, go to “Completing the parts replacement” on page 152
.
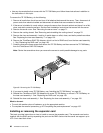
Removing the TR 700 Battery
Attention: Do not open your server or attempt any repair before reading and understanding “Safety information”
on page iii and “Guidelines” on page 69.
This topic provides instructions on how to remove the TR 700 Battery if your server has a ThinkServer RAID
700 Adapter with a TR 700 Battery option installed.
Before you begin, print all the related instructions or ensure that you can view the PDF version on another
computer for reference.
Notes:
• If you remove the TR 700 Battery, you will lose the backup power for the ThinkServer RAID 700 Adapter.
Chapter 6. Installing, removing, or replacing hardware 95