


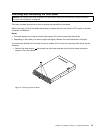

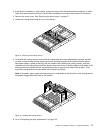
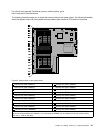
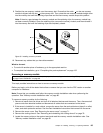
10. Ensure that the two screw holes in the rear of the left cage are aligned with the corresponding holes in
the chassis. Then, install the two screws to secure the left cage in position.
Figure 45. Installing the screws to secure the left cage
11. If your server has a slim optical drive installed, reconnect the signal cable and the power cable to the
rear of the slim optical drive.
12. Refer to your note to reconnect other cables to the system board. You also can refer to “System board
components” on page 41
to locate the connectors on the system board and reconnect cables.
13. Go to “Completing the parts replacement” on page 152.
Installing or removing a memory module
This topic provides instructions on how to install or remove a memory module.
Note: The memory modules are extremely sensitive to ESD. Ensure that you read and understand “Handling
static-sensitive devices” on page 70 rst and carefully perform the operation.
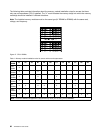
Memory module installation rules
Your server has 20 memory slots and it has the following features:
• Supports 4 GB, 8 GB, and 16 GB 1333 MHz DDR3 low-voltage registered dual inline memory modules
(LV RDIMMs)
• Supports 4 GB, 8 GB, and 16 GB 1333 MHz DDR3 RDIMMs
• Supports up to 12 normal RDIMMs when one microprocessor is installed and up to 20 RDIMMs when two
microprocessors are installed
• Supports up to 8 LV RDIMMs when one microprocessor is installed and up to 16 LV RDIMMs when two
microprocessors are installed
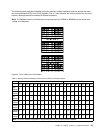
• Minimum system memory: 4 GB (only one microprocessor installed and only one 4 GB memory module
installed in the CPU1 DIMMA1 slot)
• Maximum system memory if you are using normal RDIMMs: 320 GB (two microprocessors installed and
one 16 GB RDIMM installed in each of the 20 memory slots)
• Maximum system memory if you are using LV RDIMMs: 256 GB (two microprocessors installed and one
16 GB LV RDIMM installed in each of the 16 memory slots that supports a LV RDIMM)
For more information about the memory modules in your specic server model, use the Setup Utility
program. See “Viewing information in the Setup Utility program” on page 53
.
80 ThinkServer User Guide