


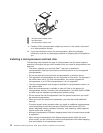
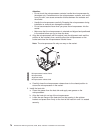
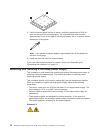
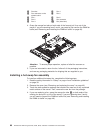
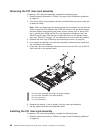

1 Fan tabs 6 Fan 4
2 Fan connector on the
system board
7 Fan 5
3 Fan 1 8 Fan 6
4 Fan 2 9 Fan connector
5 Fan 3 10 Fan (side view)
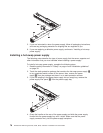
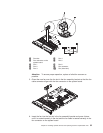
4. Grasp the orange fan tabs on both ends of the fan and pull it up out of the
server. If you are removing fans 3 and 4, you need to first remove the DIMM air
baffle (see “Removing and installing the DIMM air baffle” on page 48).
Attention: To ensure proper operation, replace a failed fan as soon as
possible.
5. If you are instructed to return the fan, follow all of the packaging instructions,
and use any packaging materials for shipping that are supplied to you.
Installing a hot-swap fan assembly
To install an additional hot-swap fan, complete the following steps:
1. Read the safety information in “Safety” on page vii and “Installation guidelines”
on page 39.
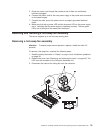
2. Remove the cover (see “Removing and replacing the cover” on page 43).
3. Touch the static-protective package that contains the new fan to any unpainted
metal surface on the server. Then, remove the new fan from the package.
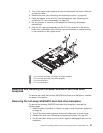
4. If you are replacing a fan, grasp the orange fan tabs 1 on both ends of the
existing fan and pull it up out of the server. If you are replacing fans 3 and 4,
you will need to remove the DIMM air baffle first (see “Removing and installing
the DIMM air baffle” on page 48).
80 ThinkServer RD210 Types 3795, 3796, 3818, and 3819: Installation and User Guide