


Loading paper and specialty media
This section explains how to load the standard tray (Tray 1), also known as the 550-sheet tray, an optional 550-sheet
tray, an optional 2,000-sheet tray, a multipurpose tray, and an optional 550-sheet specialty media drawer. It also
includes information about paper orientation, setting the Paper Size and Paper Type, and linking and unlinking trays.
Setting the paper size and type
Note: Trays with matching paper size and paper type settings are automatically linked by the printer. When a linked
tray runs out of paper, the printer draws from another tray.
To change the paper size and type settings:
1 Make sure that the printer is on and Ready appears.
2 From the printer control panel, press .
3 Press the down arrow button until
Paper Menu appears, and then press .
4 Press the down arrow button until Paper Size/Type appears, and then press .
5 Press the down arrow button until the correct tray appears, and then press .
6 Press the down arrow button until appears next to the correct size, and then press .
7 Press the left or right arrow button to scroll through the list of possible paper types. Press at the correct paper
type.
Submitting Selection appears. The printer returns to the Paper Size/Type.
8 Press three times to return to the Ready state.
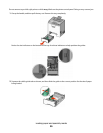
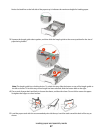
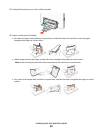
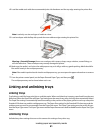
Loading the paper tray
The printer has up to five input sources to select from: the standard tray (Tray 1), also known as the 550-sheet tray,
an optional 550-sheet tray, an optional 2,000-sheet tray, a multipurpose tray, and an optional 550-sheet specialty
media drawer. Load the paper or specialty media used for the majority of print jobs in Tray 1. Proper paper loading
prevents jams and facilitates trouble-free printing.
Note: The C736n, C736dn, and C736dtn model printers will support a total of four optional input sources. The C734n,
C734dn, C734dtn, and C734dnw model printers will support a total of three optional input sources.
Loading paper and specialty media
55