


5 From the Fax area, press the Options button.
6 Press the arrow buttons until Delayed Send appears, and then press .
Set Send Time appears on the first line, and HH:MM with a blinking cursor appears on the second line.
7 Using the numeric keypad, enter the time you want to send the fax. After you enter the time, the cursor moves to
the AM or PM field if the printer clock is set to 12 Hour format. Press the arrow buttons to change from AM to
PM or PM to AM.
8 Press .
Set Send Date appears on the first line, and MM‑DD‑YYYY with a blinking cursor appears on the second line.
9 Using the numeric keypad, enter the date you want to send the fax.
10 Press .
11 Press to send a black only fax or to send a color fax.
Viewing a fax log
1 Open a Web browser.
2 In the address bar, type the IP address of the printer, and then press Enter.
3 Click Reports.
4 Click Fax Settings.
5 Click Fax Job Log or Fax Call Log.
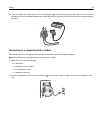
Canceling an outgoing fax
A fax can be canceled when the document is in the ADF or on the scanner glass. To cancel a fax:
1 From the printer control panel, press .
Stopping appears, and then Cancel Job appears.
2 Press to cancel the job.
Note: If you want to continue to process the job, press to resume scanning the fax.
Canceling appears.
The printer clears all pages in the ADF and then cancels the job.
Faxing 104