


Printing labels
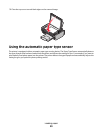
1 Load the label sheets in the printer.
2 Do one of the following:
Using Windows
a With a document open, click File Print.
b Click Properties, Preferences, Options, or Setup.
c From the Paper Size drop-down menu of the Print Setup tab, choose a paper size that matches the size of the
label sheet. If no paper size matches the label sheet size, then set a custom size.
If necessary, choose the appropriate type of media from the Media Type drop-down menu.
d Click OK to close any printer software dialogs.
e Click OK or Print.
Using Macintosh
a Customize the settings as needed in the Page Setup dialog.
1 With a document open, choose File Page Setup.
2 From the “Format for” pop-up menu, choose the printer that you want to use.
3 From the Paper Size pop-up menu, choose a paper size that matches the size of the label sheet. If no paper
size matches the label sheet size, then create a custom size.
b Customize the settings as needed in the Print dialog.
1 With a document open, click File Print.
2 From the Printer pop-up menu, choose the printer that you want to use.
3 From the print options pop-up menu, choose Quality & Media.
4 From the Paper type pop-up menu, choose a paper type.
5 From the Print Quality menu, choose a print quality other than Quick Print.
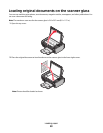
Tips on loading label sheets
• Make sure the top of the label sheet feeds into the printer first.
• Make sure the adhesive on the labels does not extend to within 1 mm of the edge of the label sheet.
• Make sure the paper guide or paper guides rest against the edges of the label sheet.
• Use full label sheets. Partial sheets (with areas exposed by missing labels) may cause labels to peel off during
printing, resulting in a paper jam.
Note: Labels require more drying time. Remove each label sheet as it exits, and then allow it to dry to avoid ink
smudging.
Printing
66