


Using Macintosh
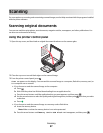
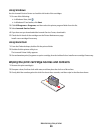
1 Load an original document facedown on the scanner glass.
2 From the Finder desktop, double-click the printer folder.
3 Double-click XXXX Series Center, where XXXX is the printer series.
4 From the “What is being scanned?” menu, choose the type of document to be scanned.
5 From the “How will the scanned image be used?” pop-up menu, choose To be faxed.
6 From the “Send scanned image to” pop-up menu, choose Preview.
7 If you have more than one page to fax, select Prompt for multiple pages.
8 Click Scan.
The Scan dialog appears with a preview of the document.
9 From the Scan dialog, click File Print.
10 Do one of the following:
• In Mac OS X version 10.4 or later, select Fax PDF from the PDF drop-down menu.
• In Mac OS X version 10.3, click Fax.
11 In the “To” field, enter the fax number of the recipient.
You can also click
to choose a recipient from the Address Book, a built-in application in Macintosh. The Address
Book shows only contacts with fax numbers.
12 If you want to include a cover page, select Use Cover Page, and then enter the subject of the fax and a message
for the recipient.
13 Click Fax.
Receiving a fax
Using Windows
1 Do one of the following:
• In Windows Vista, click .
• In Windows XP and earlier, click Start.
2 Click All Programs or Programs, and then select the printer program folder from the list.
3 Click Lexmark Productivity Studio.
4 From the Settings area in the left pane of the Welcome screen, click Set up and manage faxes.
5 From the “I Want To” menu, click Adjust speed dial list and other fax settings.
6 Click the Ringing and Answering tab.
7 From the “Automatically answer incoming calls as a fax” area, select On from the Auto Answer drop-down list.
8 To turn the Auto Answer feature on and off at scheduled times, select the settings that you want from the
drop-down lists.
Faxing
92