


26 INSTALLERS MANUAL | Copyright © 2006 Digimerge Technologies Inc.
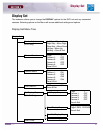
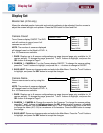
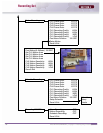
Display Set
SECTION 4
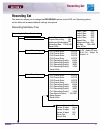
Set Display Sequence
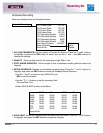
1. FULL DISPLAY SEQUENCE: Set the length of time each camera is displayed in cycling Full
Screen Display mode:
• PAGE: Displays up to 8 camera configurations per page (second page only available for 16
camera setups). To change the page, press the K and L buttons to highlight, and press the
SEL button to change to Page 2.
• CAMERA 1 - CAMERA #: Set the length of time that a Camera is displayed in Sequence
Mode. To change the camera setting, press the
K and L buttons to highlight, and use the I
and J buttons on the front of the DVR to change the length of time a Camera is displayed.
Options include 5, 10, 15, 30, 45, 60 (in seconds) and Bypass.
• SAVE & EXIT: Saves any changes made, and exits to the Main Menu. Press the
K and L
buttons to highlight, and press the SEL button to accept the changes.
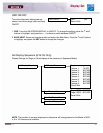
2. QUAD DISPLAY SEQUENCE: Set the length of time each QUAD of cameras (4 cameras per
page) is displayed in cycling QUAD Display mode:
• PAGE # SEQ: Set the length of time that a QUAD of Cameras is displayed in Sequence. To
change the Page setting, press the
K and L buttons to highlight. Page 1 (Cameras 1-4),
Page 2 (Cameras 5-8) etc. Use the I and J buttons on the front of the DVR to change the
length of time a Quad is displayed. Options include 5, 10, 15, 30, 45, 60 (in seconds) and
Bypass.
• SAVE & EXIT: Saves any changes made, and exits to the Main Menu. Press the
K and L
buttons to highlight, and press the SEL button to accept the changes.
3. START FULL DISPLAY SEQUENCE: Starts viewing Cameras in Full Screen Display Sequence
Mode (based on the settings configured in the FULL DISPLAY SEQUENCE menu).
4. START QUAD DISPLAY SEQUENCE: Starts viewing Cameras in QUAD Display Sequence
Mode (based on the settings configured in the QUAD DISPLAY SEQUENCE menu).
Event Clear
Clears the OSD characters related with events from the monitor display.