


36 INSTALLERS MANUAL | Copyright © 2006 Digimerge Technologies Inc.
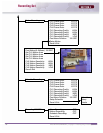
System Set
SECTION 4
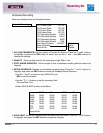
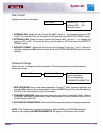
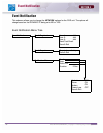
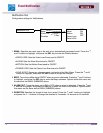
Client Account
Configuration for additional user accounts.
1. ADD NEW ACCOUNT: Add a new user account to the system. Press the K and L buttons to
highlight, and press the SEL button to access the User Setup screen:
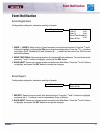
• USER ID: Enter the user ID. Press the KLIJ and Numbers (0-9) and Letters (A-Z, @ - _)
on the front panel of the DVR to enter information.
• PASSWORD: Enter a password. Press the
K and L buttons to highlight, and press the SEL
button to set a new password. Use the NUMBER keys (0-9) on the front panel of the DVR
to set the password of up to 8 characters.
• CONFIRM PASSWORD: Enter the same password as set above. Press the
K and L buttons
to highlight, and press the
SEL button to set a new password. Use the NUMBER keys (0-9)
on the front panel of the DVR.
• EXIT: Exits without setting up an account.
2. DELETE ACCOUNT: Displays a list of accounts.Press the K and L buttons to highlight, and
press the
SEL button to access the User list. Select a user and press the SEL key to delete the
account.
3. SAVE & EXIT: Saves any changes made, and exits to the Main Menu. Press the K and L buttons
to highlight, and press the SEL button to accept the changes.
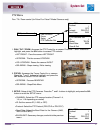
Program Update
Allows the user to update the DVR firmware by downloading the most current application from
the Digimerge website, and using a Memory Stick. Download the most current program from the
http://www.digimerge.com website, and copy it to a Memory Stick. Connect the Memory Stick
to the USB 2.0 Port on the front panel of the DVR.
1. Enter the Menu - System Set and choose Program Update:
• NEW PROGRAM FOUND: If the new application is recognized, the DVR unit will display a
processing percentage. Reboot the DVR once complete.
• NEW PROGRAM NOT FOUND: If the application is not recognized, processing will not
continue.
Auto Delete Set
Sets the length of time that data will be held in the hard drive before it is deleted. Press the K and
L buttons to highlight the AUTO DELETE SET option, and press the SEL button to access the
day setting. Use the Number pad to set the option between 0 days to 99 days or None. Choose
the Save & Exit option to accept the changes to this option. The default setting is None.
User ID
Password
Confirm Password
Exit without register
Client Account
Add New Account
Delete Account
Save & Exit
Client List