


Getting Started with Base Only Systems 7 000001630
MaxAttach NAS 6000 Getting Started
Getting Started with Base Only Systems
8: Re-Seat All Hard Disk Drive Carrier Assemblies
10/16/01 -- Revision 2.0.03
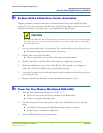
8: Re-Seat All Hard Disk Drive Carrier Assemblies
Shipping vibration may have disconnected individual hard drives from their back plane
connectors. One drive at a time, pull the drive out of its Drive Bay, record its size and serial
number information, and replace it in its as-shipped Drive Bay location.
CAUTION
REPLACE IN ORIGINAL DRIVE BAY: Be sure to replace the drive in its original as-shipped
Drive Bay. If you mix the drives and Drive Bays up, you will probably have to reconfigure
the disk RAID arrays.
1. For each drive, push down on the Ejector Tab, and then lift up on the Ejector Lever.
n The drive releases from its Drive Bay connector.
2. Pull the drive out of its Drive Bay.
n This is a good time to record the drive type and serial number.
3. Replace the drive in its Drive Bay until it begins to engage the connector.
4. Make sure the Ejector Lever is free of the Ejector Tab and place your fingers on
either side of the drive LEDs and press gently into the bay.
5. Lower the Ejector Lever to latch the drive into place and then lock the Ejector Lever
on the Ejector Tab.
6. Repeat until all hard disk drive carrier assemblies have been re-seated.
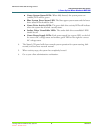
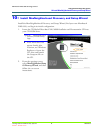
9: Power Up Your Maxtor MaxAttach NAS 6000
1. Turn the back panel rocker switches to “ON” or “|”.
n There are two rocker switches on the Base Unit Back Panel.
n There is no required starting order.
2. Press the front panel soft rocker switch in the lower right hand corner to start the
units.
n You will receive front panel indications that the system is booting.
n It takes about 4.5 minutes to fully boot.
3. System LEDs will show normal boot status.