Basic operation (continued)
Setting the aspect ratio
You can change the aspect ratio of the input video
signal (or the ratio of width to height of the image).
Change the setting according to the type of the input
video signal.
With the remote control:
1. Press the ASPECT button.
• EverytimetheASPECTbuttonispressed,the
aspect mode changes from Normal to 16:9, to
Full, and back to Normal.
With the Picture menu:
(See page 22 for menu setting.)
1. Display the Picture menu.
2. Select Aspect Ratio by pressing the or button.
3. Select your desired aspect ratio by pressing the
or button.
When 16:9 is selected. (For XD700U only)
4. Press the ENTER button.
5. Select your desired position (Center, Upper or
Lower) by pressing the or button.
To cancel the menu:
6. Press the MENU button.
Important:
• Whena16:9imageiskeptdisplayedforalong
time before displaying 4:3 image, the afterimages
of the black bars may appear on the 4:3 image
screen. Consult your dealer in this case.
Caution:
• Thelampcan’tbelitagainforoneminuteafter
turned off for safety purpose. It will take another
one minute for the STATUS indicator to go out. If
you want to turn on the projector again, wait until
the indicator goes out, and then press the POWER
button.
• Theexhaustfansrotatefasterasthetemperature
around the projector rises.
• Whenthetemperaturearoundtheprojectorrises
high, the sign “Temperature!!” blinks red on the
screen. If the temperature stays high, the lamp will
go out automatically.
Important:
• Donotdisplayastillpictureforalongtime
because the afterimages may persist on the screen.
When connecting to a laptop computer:
When this projector is connected to a laptop
computer, there may be times when images may not
be projected. When it occurs, set the computer so that
it can output signals externally. The procedure varies
across computers in use. See the instruction manual
of your computer.
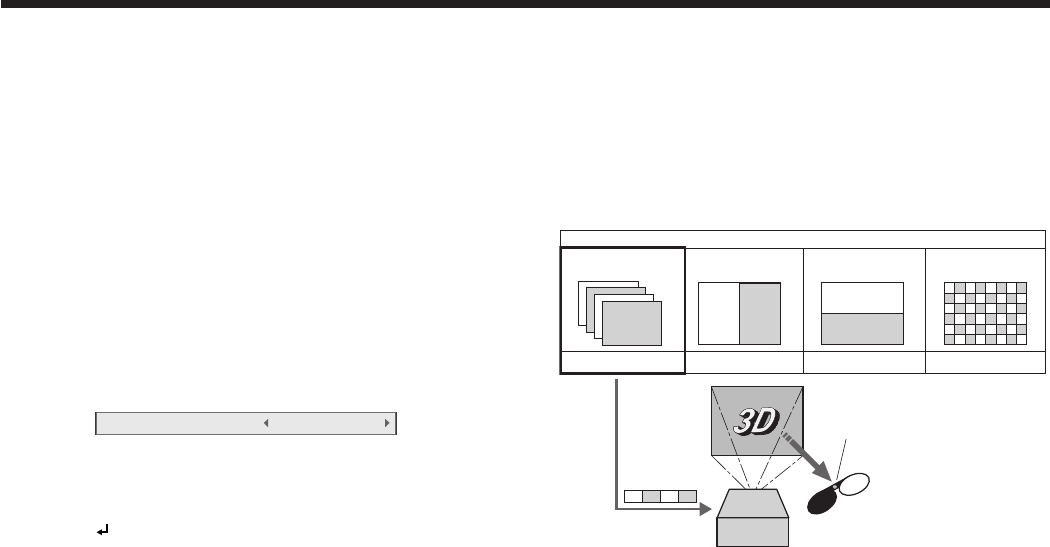
Watching 3D content
You can enjoy 3D content with this projector.
In order to watch 3D content, you need to have the
following items:
• Field-sequential3Dvideocontents
• DLP™Link™active3Dglasses
(Field-sequential: The system which displays
alternately the image for the left eye and the right eye.)
RLRRLRLL
RLRLRLRL
RLRRLRLL
RLRLRLRL
RLRRLRLL
RLRLRLRL
RL
R
L
L
L
R
R
R
L
RL
3D image Format
Page flipping
(Field sequential)
Top & bottom CheckerboardSide by side
Not supported Not supportedNot supportedSupported
DLP™ Projector
The shutter timing of the 3D
glasses is controlled by
being synchronized with
switching of right and left
3D image which is detected
by the sensor of glasses.
DLP™ Link™ active
3D glasses
LR
Sensor
Play the field-sequential 3D video contents on a
computer or DVD player, and then, connect the cable
with the projector.
Go to the Picture menu (or press the 3D button on
the remote control) and set the 3D option to On.
(See page 23.)
Put on the 3D glasses to watch the contents.
If the contents are not projected correctly, go to the
Picture menu, and switch the 3D Sync Invert option to
On.
Important:
• Youcannotprojectthe3Dcontentfromtheinput
source LAN Display, USB Display, and PC Less
Presentation.
• Iftheviewingdistanceisnearerthanthe
recommended distance, it will cause physical
discomfort and eye fatigue.
• Watchthecontentsinfrontofthescreen,notatbig
angle. If you are viewing the screen at big angle,
you may not be able to view 3D contents correctly.
• Ifyouarenotviewing3Dcontentscorrectly,
check to see if the 3D glasses are powered on or
adequately charged. See the instruction manual of
the 3D glasses for more information.
• Therearepersonaldifferencesinviewingthe3D
images. For persons with myopia, hypermetropia,
astigmatism or left and right sights, please wear
glasses to correct them then wear the 3D glasses.
• Thepictureseemsmisplacedatthestartof
projecting the 3D images, however, this is not a
malfunction.
• Withthe3DoptionsettoOn,contentsdisplayed
on the projector appear darker. It is normal and
does not mean the projector is malfunctioning.
