


Chapter 4 PCMCIA Serial Hardware Installation, Verification, and Configuration
Serial Hardware and Software for Windows 4-18 ni.com
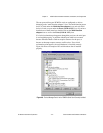
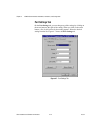
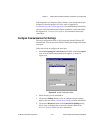
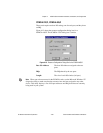
Select Resources for the PCMCIA Card
Complete the following steps to select resources for your PCMCIA card.
1. Select Start»Settings»Control Panel.
2. Double-click on the niports icon.
3. Select the PCMCIA card you just installed from the Add a New
PCMCIA Card list,andclickontheAdd button.
4. In the Resource Configuration dialog box, select nonconflicting base
I/O address and IRQ settings for your port/card, and click on OK.
For more information on selecting resources for your port/card, refer
to the Resource Settings section.
5. Exit niports and restart the computer.
After you have selected resources for your PCMCIA card, proceed to the
next section, Verify the Installation.
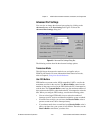
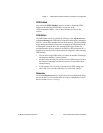
Verify the Installation
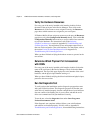
Determine Which Physical Port Is Associated
with COMx
Select Start»Settings»Control Panel, and double-click on niports.Alist
showing installed National Instruments ports with their logical COMx
names appears. If your interface is not on the list, refer to Appendix D,
Troubleshooting and Common Questions.
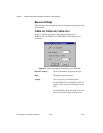
Select the COM port you want and click on the Settings button to display
the General Port Settings dialog box for that port. This dialog box
displays the physical port number starting at 1.
When you have finished verifying the driver installation and physical port,
proceed to the next section, Run the Diagnostic Test.
Run the Diagnostic Test
To verify and test the installation, run the diagnostic program that came
with your NI-Serial software. The diagnostic program verifies that your
serial driver is installed properly, that the configuration of your hardware
does not conflict with anything else in your system, and that the serial
driver can communicate with your hardware correctly.
To run the test, select the diagnostics item under Start»Programs»
National Instruments Serial.