


13
*** Condential - DO NOT Distribute ***
Director
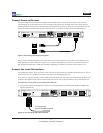
Install Director Network Modules
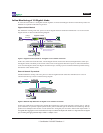
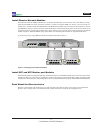
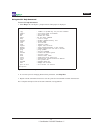
If the Director Network Modules (DNMs) are not already installed when you receive the unit, install them by sliding
them into the DNM slots in the front panel. (If there is a plate covering the DNM slot, remove it by unscrewing two
thumb-screws, and then install the DNM module.) The DNM circuit boards ride in the rails provided in the slots. Push in
the DNM rmly until you feel the connectors mate and the bezel is ush with the front panel, but do not force them. If you
encounter resistance, withdraw the module and try again, making sure to align the circuit board in the rails and slide the
module straight in. When the DNM is fully seated, fasten it to the front panel with the two captured thumbscrews.
If you are only using a single DNM, it should be installed in the left slot (Slot 1).
www.netoptics.com
1
2
B
A
A B
Slot 1 Slot 2
Installing Director Network ModulesFigure 8:
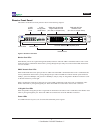
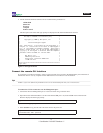
Install SFP and XFP Monitor port Modules
SFP and XFP modules are shipped separately. Install them as desired in the SFP and XFP slots in the front on the chassis,
and the two XFP slots in the rear. For each module, remove the temporary plug from the SFP or XFP slot and insert the
module until it clicks into place. The photograph on the cover of this Guide shows properly installed SFP and XFP modules.
Rack Mount the Director device
Director is designed for rack mounting in a 19-inch rack panel. The panel occupies one rack unit. To rack mount the
Director device, simply slide it into the desired rack location and secure it using the four supplied screws.