


MCS 5100 RTP Media Portal Basics
91
Copyright © Nortel Networks Limited 2006
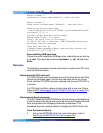
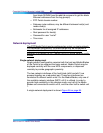
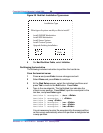
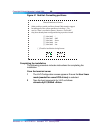
Figure 38 BIOS Setup Utility screen
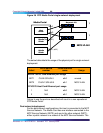
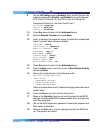
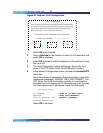
3 From the Advanced menu, move to IDE Configuration and
press Enter.
4 Verify, or change, the values on screen to match the values listed
below. Leave all other values as default.
Local Bus IDE adapter: [Disabled]
Large Disk Access Mode: [DOS]
SMART Device Monitoring: [Disabled]
Primary Master: [NONE]
Primary Slave: [NONE]
Secondary Master: [NONE]
Secondary Slave: [NONE]
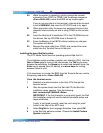
5 Press Esc twice to return to the Advanced menu.
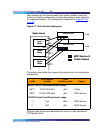
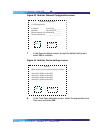
6 Move to PCI Configuration and press Enter.
7 Verify, or change, the values on screen to match the values listed
below.
Default Primary Video Adapter: [AGP]
On-Card Ethernet 1: [Enabled]
Ethernet 1 Connection: [Rear]
Ethernet 1 Option ROM: [Disabled]
On-Card Ethernet 2: [Enabled]
Ethernet 2 Connection: [Rear]
Ethernet 2 Option ROM: [Disabled]
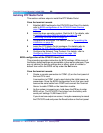
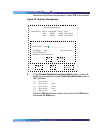
8 Move to the HA configuration sub-menu and press Enter.
BIOS Setup Utility
Main Memory Advanced Security Status Boot Exit
BIOS Version CPV5501 1.0RM01
Board Version 01-R5347P09A
Board Serial No. 9975639
CPU Type Pentium (R) III
CPU Speed 700 MHz
Cache RAM 256 KB
Total Memory 512 KB
System Time: [09:59:07]
System Date: [09/17/2003]
Item Specific Help
__________________
<Tab>, <Shift-Tab>, or
<Enter> selects field.