


Rack Mounting
6-3
Rack Mount Installation Procedure
Nortel Networks recommends that you have two people available when installing
the unit into the rack.
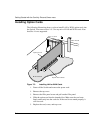
1.
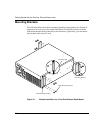
Position the bracket onto the Switch (as shown in Figure 6-1), then screw
in the four rack-mounting screws. Repeat this step on the other side of the
chassis.
2.
With one person holding the Switch in place, insert the two front screws
on each side to secure the Switch and brackets into the rack.
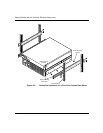
Sliding Rails (Optional)
Figure 6-2 shows the optional sliding rail assembly that enables you to slide the
Switch out of the rack and lift off the top cover for interior access. Note that the
sliding rail kit is optional and is ordered separately.
Optional extender brackets and hardware are provided in case your rack is deeper
than 20 inches. Attach the extender brackets to the sliding rails.
Nortel Networks recommends that you have two people available when installing
the sliding rail assembly. The job is easier when one person holds the rail brackets
to the rack sides while the other person secures the brackets to the rack. A second
person is again necessary when sliding the chassis into the rails.
NOTE:
You must have a 4-post rack to use the sliding rail mount assembly,
and the rack must be at least 20 inches deep.