


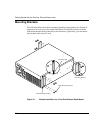


Rack Mounting
6-5
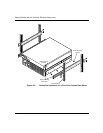
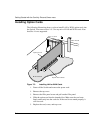
Sliding Rail Installation Procedure
NOTES
• Insert all bracket mounting screws so that the screw heads are inside
the slides.
• Do not use washers on the inside of the slides.
• Mount the side brackets parallel to each other.
• Determine if the unit will slide to the front or rear of the rack.
These instructions are for sliding the chassis forward; reverse the closed-end
bracket for rearward travel.
1.
Separate the slide rails from the rail bracket by pressing down on the
lock-release spring.
2.
Mount the rail brackets to the inside of the rack, screwing an end
into each rail post. Do not tighten the screws until the chassis has
been installed.
3.
Mount the sliding rails to the chassis. Note that the closed-end bracket
must be mounted at the front.
4.
Mount the slide locking bracket to the top front left and right sides
of the chassis.
5.
Pull out the bracket inner-rails so that the ball retainers are fully forward.
Install the chassis by positioning the slides into the slide rail brackets and
pushing the chassis into the rack.
6.
Verify that the chassis slides correctly by pulling it forward and pushing it
closed. If it does not move smoothly, then the rails might not be aligned
properly; check the alignment.
7.
Adjust the slide’s positioning until the movement is smooth. Then, tighten
all screws.
8.
Push the sliding rails in completely, then secure the rails by inserting a
screw into the slide locking bracket.