30 C1692M (12/05)
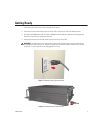
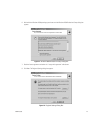
4. If you receive a prompt requesting that you enter a password, contact your system administrator for assistance
logging into and changing the DX8000 BIOS Setup.
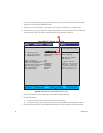
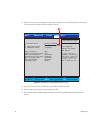
5. Use the cursor control (arrow) keys on your keyboard to move right to the Boot option in the Main screen.
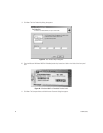
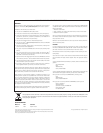
6. Press the minus (-) key on your keyboard to change the boot sequence from the hard disk to the CD or DVD drive
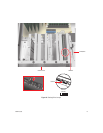
installed on your system. The screen should look something like the example in Figure 29.
Figure 29.
BIOS Boot Screen with CD/DVD Drive at Top
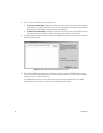
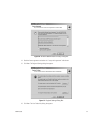
7. Press the F10 function key on your keyboard to save and exit the BIOS setup screen.
8. Finalize BIOS changes:
•
To accept the boot sequence changes and reboot, press the Enter key.
•
To cancel the changes, press the Esc key and then press Ctrl+Alt+Delete keys simultaneously to reboot.
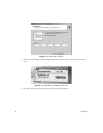
9. Wait while your system boots from the DX8000 Reinstallation CD, and then proceed to the following section.
AwardBIOS Setup Utility
1.
2. IDE Hard Drive
3. Other Boot Device
4. Removable Device
APAPI CD-ROM
Plug & Play O/S
Reset Configuration data
Boot Virus Detection
Quick Power On Self Test
Boot Up Floppy Seek
Full Screen Logo
Interrupt Mode
[No]
[No]
[]
[En ]
Disabled
abled
[Disabled]
[Enabled]
[APIC]
Item Specific Help
<Enter> To select
the device.
To select the boot
sequence, use the up or
down arrow. Press <+>
to move the device up
the list, or <-> to
move it down the list.
F1 Help
ESC Exit
Select Item -/+
Select Menu Enter
Change Values F5
Select Sub-Menu F10
Setup Defaults
Save and Exit
Main Advanced Power ExitBoot
[]
[Maxtor 7Y250P0]
[INT18 Device (Networ]
[Disabled]
TEAC CD-W552E
Boot Sequence: