C698M-A (6/04) 11
PROGRAMMING THE DX2000 DVR FOR USE WITH A DATA HUB
You will need to program the following settings on the DX2000 DVR configuration screens to make
the data hub work properly.
Refer to the DX2000 Series Digital Video Recorder Installation/Operation Manual (C690M) for more
detailed programming information. Also refer to the programming screen examples in the
Installation and Programming Examples
section. They will help clarify the programming process.
Each data hub has seven ports to which data devices can be connected. Each data hub has an
eighth port (IN) that is used to daisy-chain to another data hub. The data hub’s ninth port (OUT) is
used to connect to the DX2000 DVR or to other data hubs. Up to four data hubs can be daisy-
chained through data ports P3 and P4 of the DX2000 DVR, for a total of eight hubs.
The DX2000 can handle a maximum of 16 data inputs. You can select any combination of 16 total
data inputs from the 58 available ports (8 hubs total x 7 ports per hub = 56, plus 2 DX2000 data
ports = 58).
Do the following to program the DX2000 DVR for use with a data hub:
1. On your PC, call up Microsoft
®
Internet Explorer. Then, type the DVR’s IP address in the Address
box and press Enter. The Enter Network Password screen appears.
If the DVR’s IP address has been changed from the default (192.168.2.108:8004) and you do not
know this new IP address, you must obtain it from the network administrator.
NOTE: Port 80 is the standard web service (http) port. As an added network security measure,
port 8004 is the standard web service port for the DX2000. Therefore, any time you connect to
the DX2000 from your browser, you must add the 8004 port designation at the end of the
Internet address, proceeded by a colon (for example, http://192.168.2.108:8004). This is true for
any Internet address you choose to assign to the DX2000. Port 8004 is a fixed port number and
cannot be changed.
2. Type an administrative ID and password in the box, and then click the OK button. (The default
administrative ID is admin and the default administrative password is PELCOADM.) A
connection with the DX2000 is established.
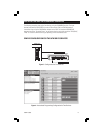
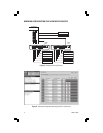
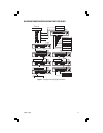
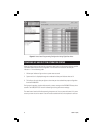
3. Click the Configuration button. Click Data Interface.