


17
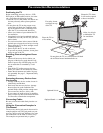
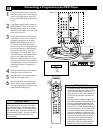
Connecting Surround Sound Equipment
DVI
G
S-VIDEO
G
S-VIDEO
RLV
RL
RL
RL
V
Pr Pb Y
RL
RL
Pr Pb Y
Pr Pb Y
RL
V
STANDARD/
HD INPUTS
STANDARD/
HD INPUTS
TUNER
RGB+HV
AV5 AV6
AV1MONSUB OUT AV2AV3AV4
OUT
SERVICE 1
2
C
+
-
+-
Audio
Input
Phase
180
0
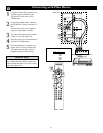
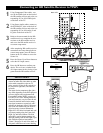
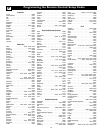
General
Daylight saving
Change PIN
Subwoofer
Lamp rating
Lamp replaced
Settings
No • Yes
4
6
7
3
8
10
5
9
11
11
C
E
N
T
E
R
C
H
A
N
N
E
L
A
M
P
IN
P
U
T
+
_
INT
EXT
_
+
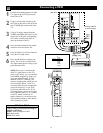
CENTER CHANNEL AMP INPUT
+
_
INT
EXT
2
1
General
Daylight saving
Change PIN
Subwoofer
Lamp rating
Lamp replaced
Settings
Yes • No
DVI
G
S-VIDEO
G
S-VIDEO
RLV
RL
RL
RL
V
Pr Pb Y
RL
RL
Pr Pb Y
Pr Pb Y
RL
V
STANDARD/
HD INPUTS
STANDARD/
HD INPUTS
TUNER
RGB+HV
AV5 AV6
AV1MONSUB OUT AV2AV3AV4
OUT
SERVICE 1
2
C
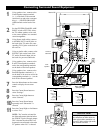
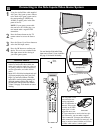
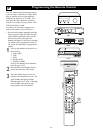
Back of TV
Back of Receiver
(example only)
Surround (Back)
Speakers
Front
Speakers
Powered
Subwoofer
1
Using speaker wires, connect to the
Center Speaker output terminals
(+, –) on the back of the surround
sound receiver and to the correspon-
ding (+, –) CENTER CHANNEL
AMP terminals on the back of the
TV.
2
Set the CENTER CHANNEL AMP
INPUT switch to EXT. This allows
the TV cabinet speakers to be used
as the center speakers in a surround
sound arrangement.
3
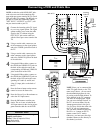
Using Stereo Audio cables, connect
to the MON OUT L and R jacks on
the back of the TV and to the corre-
sponding TV IN jacks on the back of
the receiver.
4
Using an Audio cable, connect to the
SUB OUT jack on the back of the
TV and to the Audio Input jack on
the back of a powered subwoofer.
5
Using speaker wires, connect to the
R and L Front Speakers terminals
and to the corresponding terminals
on the backs of the front speakers.
6
Using speaker wires, connect to the
Surround Speakers terminals (+, –)
on the back of the receiver and to the
corresponding terminals (+, –) on the
back of the surround speakers.
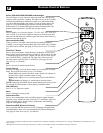
7
Press the Menu button on the remote
control to display the on-screen
menu.
8
Press the Cursor Down button to
select “Settings.”
9
Press the Cursor Right button to
select “General.”
10
Press the Cursor Down button
repeatedly until “Subwoofer” is
selected.
11
Press the Cursor Right or Left button
to select “Yes.”
NOTE: “Yes” must be activated for
the Subwoofer menu selection before
the SUB OUT jack will supply output.
This is because the subwoofer’s low
frequencies are redirected to the main
TV speakers when “No” is selected.
To simplify making connections,
the connectors on audio cables are
often color coded to match the col-
ors on TV jacks: red for right audio,
and white for left audio.
HELPFUL HINT