


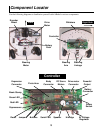


13
Painting
ARobot's paint job is your first chance to be creative and have a little fun. Who wants every robot to
look alike anyway? Five parts are candidates for painting: The robot base, 2 motor brackets, encoder
wheel, and the motor coupling. Or if you prefer, simply leave these parts unpainted.
Here's the process:
Sanding
Paint primer
Finish coat
Accents
Sanding
Sand the metal, especially the edges, with fine sand paper (200-600 grit). This process could also be
done with a file. When done, clean the surface well using soapy water. Dry thoroughly before continu-
ing.
Paint Primer
Paint primer is a special kind of fast-drying paint that helps paint stick to a surface. Primer is normally
gray or red and comes in a normal spray can. You’ll need less than one can. Read and follow the in-
structions on the paint can. Make sure the surface is clean and dry before priming.
Finish Coat
Apply the finish coat according to the directions on the paint can. You may want to check out some of
the non-conventional paints that add texture to a surface. Normally you should let the finish coat dry
overnight before continuing.
Accents
Be creative, consider using special accents to make your robot stand out.
Masking to create special shapes such as flames or zebra stripes.
Colored electrical tape from Radio Shack - Catalog #64-2340.
Colored adhesive dots from an office supply store.
Flexible, plastic molding from an auto parts store.
Stick-on reflectors from a motor cycle shop.
Textured paint for special effects.
Text using stick-on letters or a permanent marker.
Use large washers on the rear wheel axles as hub caps.
Oh I almost forgot, try using your imagination!.
See some great examples of creative paint jobs on our web site at www.robotics.com/arobot
It may be necessary to clean out holes on the robot that have a build-up of paint. Simply use a pocket
knife or Exact-o knife to clean them out. This is especially important on the whisker wire mounting
holes since they must make electrical contact to the base for grounding. We’ll deal with this later.