


Whiskers
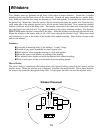
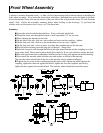
Two whisker wires are mounted on the front of the robot to detect obstacles. Locate the 4 whisker
mounting holes near the front center of the robot body. Scratch off paint around the two smaller holes.
Next, bend each whisker wire using the drawing as a full scale pattern. Locate the body cable and find
the ground lug. Mount the 2 whisker spacers like the drawing and place the ground wire from the body
cable under one of the whisker spacers and a #4 star washer under the other. Next, mount the whisker
brackets which are wired to the body cable. The bracket connected to the white wire is the robot’s right
side, the black wire is the left side. Pay special attention to the plastic insulating washers. The brackets
MUST NOT make electrical connection to the body. Slide the whisker wires through the bracket hole.
Mount the whisker to the spacer with a 4-40 x 3/16 screw through the whisker's loop. When done, bend
each whisker so it rests in the center of the bracket hole without touching. Place a piece of tape on the
end of each whisker.
Summary:
Locate the 4 mounting holes (2 per whisker) 2 small, 2 large.
Scratch off any paint around the two small spacer holes.
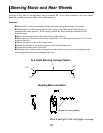
Bend whisker wires using the drawing as a full scale pattern.
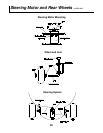
Mount the spacers and brackets according to the drawing.
The whisker wires should rest inside the bracket hole without touching.
Place a small piece of tape over the ends of prevent poking people.
How it Works:
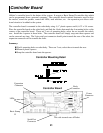
The robot’s body is connected to the battery minus wire (ground) which connects to the spacers and the
whisker wires. When the whisker wire is bumped, it touches the metal bracket. These metal brackets
are wired to the controller through the body cable. In a program, the robot can read the whisker status.
14
Whisker Placement