


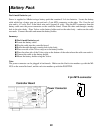


Battery Pack
Don’t install batteries yet.
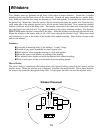
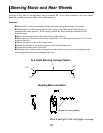
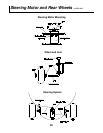
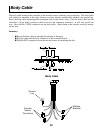
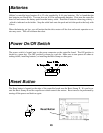
Power is supplied to ARobot using a battery pack that contains 8 AA size batteries. Locate the battery
cable which has a batter snap on one end and a 2-pin MTA connector on the other. Pin 1 has the red
wire and is +12 volts, Pin 2 is the black wire and is ground (0 volts). Plug the MTA connector from the
battery cable onto the power connector on the controller board. Route the other end through a nearby
hole in the robot body. Place Velcro on the battery holder and on the robot body – make sure the cable
can reach. Connect the cable and mount the battery holder.
Summary:
Don’t install batteries yet.
Locate the battery cable.
Plug the cable into the controller board.
Route the cable through a nearby hole in the body.
Place one side of the Velcro strip on to the battery holder.
Place the other side of the Velcro strip on the bottom of the robot where the cable can reach it.
Connect the cable to the battery holder.
Mount the battery holder using the Velcro.
Note:
The power connector can be plugged in backwards. Make sure the black wire matches up with the MI-
NUS on the controller board, and the red wire matches up with the POSITIVE.
22
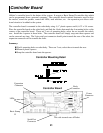
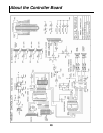
Power Connector
2 pin MTA connector
Controller Board