


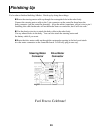


Front Wheel Assembly
18
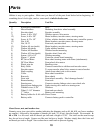
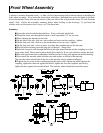
A picture is worth a thousand words – so take a look at the drawings below before starting to building the
front wheel assembly. First locate the front wheel which has a threaded bore and a red mark on the hub.
Screw the threaded front axle into the wheel so that one side of the axle protrudes about 1/2 inch from the
wheel’s hub. Follow the assembly summary below while looking at the drawings. If you bend the
whisker wires in this process don’t worry, we’ll fix them later.
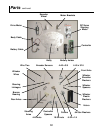
Summary:
Locate the wheel with the threaded bore. It has a red mark on the hub.
Thread the front axle through the wheel so that it protrudes 1/2“ on one side.
Don’t damage the threads on the axle!
On the short axle side, slide on a star washer and screw on the coupling – tighten.
On the long axle side, slide on a star washer then screw on a nut – tighten.
On the long axle side. screw on a nut, a washer, then another nut per the drawing.
Slip the bronze bearing onto the long side of the axle – flange first.
Insert the long axle side through the hole in the right motor bracket and the coupling on to the
drive motor shaft. The bronze bearing should fit in the hole. If not, use a knife to enlarge the hole.
Move the nut/washer/nut combination installed earlier so they push against the bronze bearing.
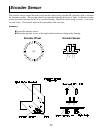
Now install the encoder wheel with the nuts and washer as shown in the drawing.
The encoder wheel should ride in the slot in the encoder sensor without touching it.
Tighten the set screw in the coupling against the motor shaft, tighten the wheel against the
coupling, tighten the other nut against the wheel, tighten the two nuts together, and finally,
tighten the nuts against the encoder wheel. The encoder wheel should not touch the sensor.